Versatile and easy on the eyes, it’s no surprise blue color schemes are a designer favorite. Light shades evoke peace and calm, perfect for a bedroom or bathroom. Medium tones can be bold and punchy, adding drama and interest to small spaces. And dark shades lend an air of sophistication and elegance. Here are some of our favorite ways local designers have crafted rooms based on the hue.
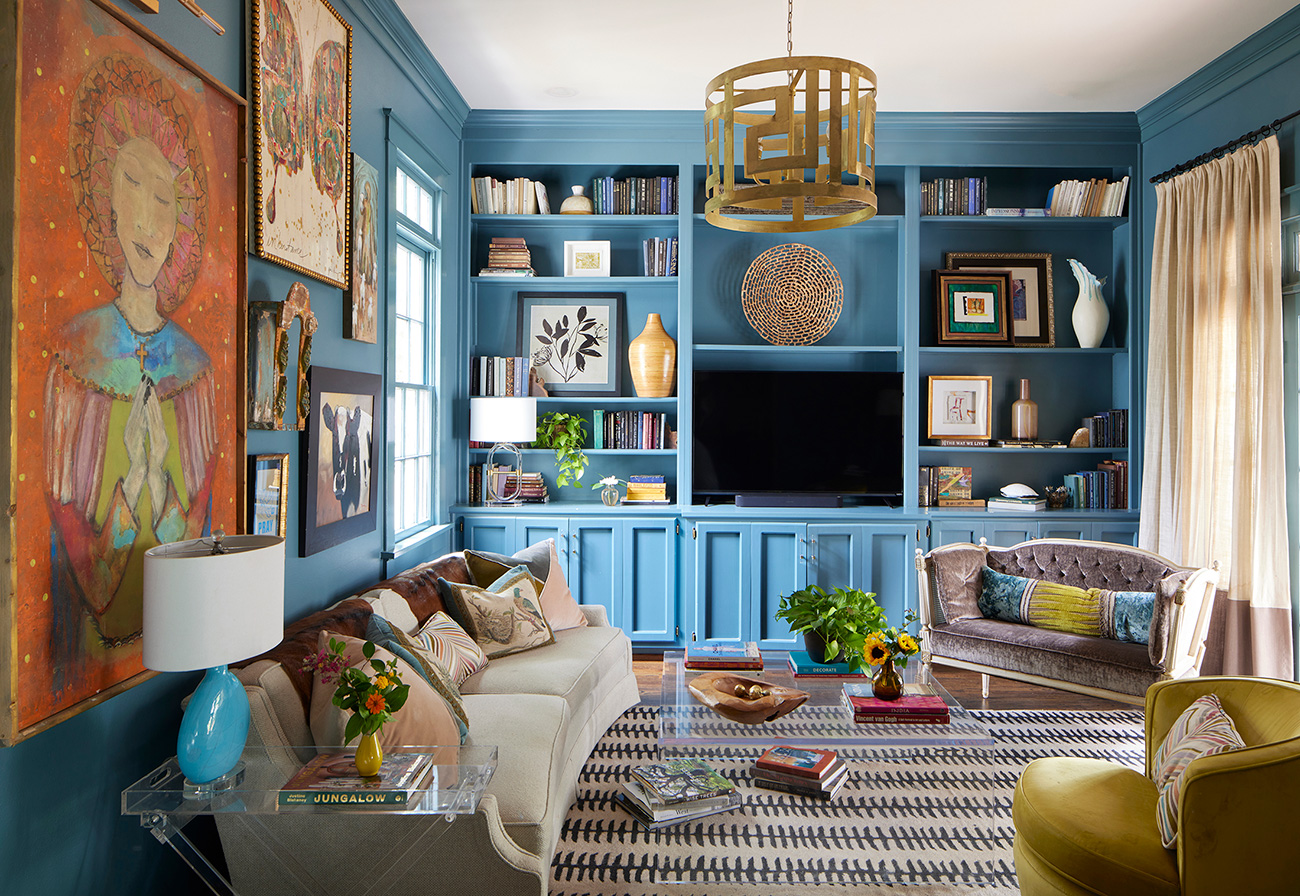
Designer Melissa Salem’s colorful art collection pairs perfectly with the den’s bright, bold walls painted Benjamin Moore Bella Blue.
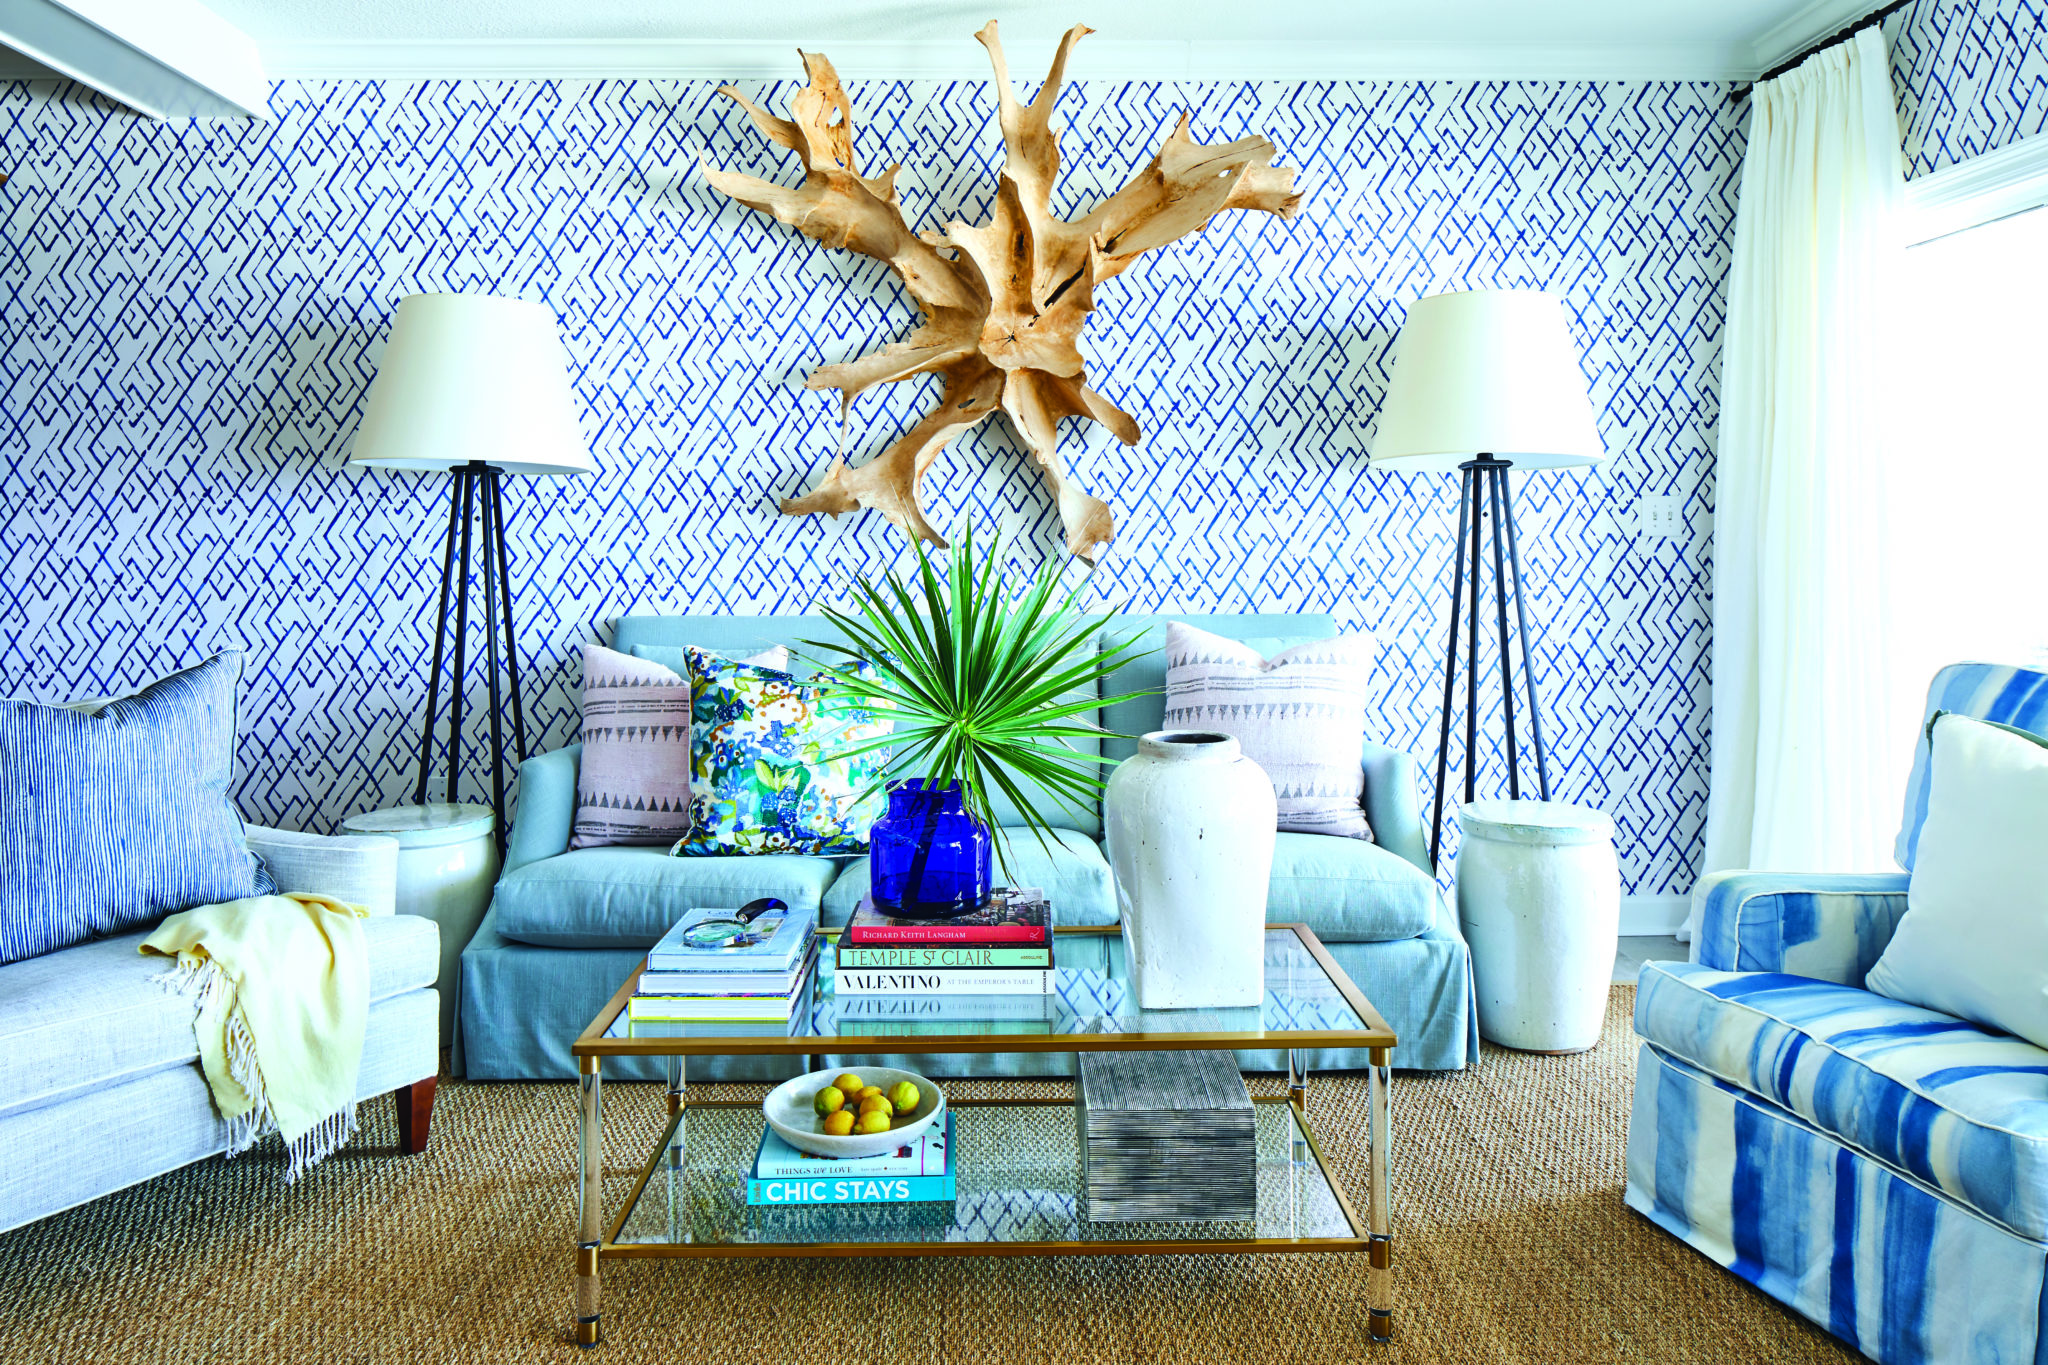
Location: Homewood, AL Designer: Melissa Salem Photo: Jean Allsopp Featured in: How to Create a Meaningful Art CollectionDesigner Ashley Gilbreath set the mood in this Orange Beach condo with a bold, graphic wallpaper by Jim Thompson. The coastal vibe continues with solid and printed textiles in various shades of blue.
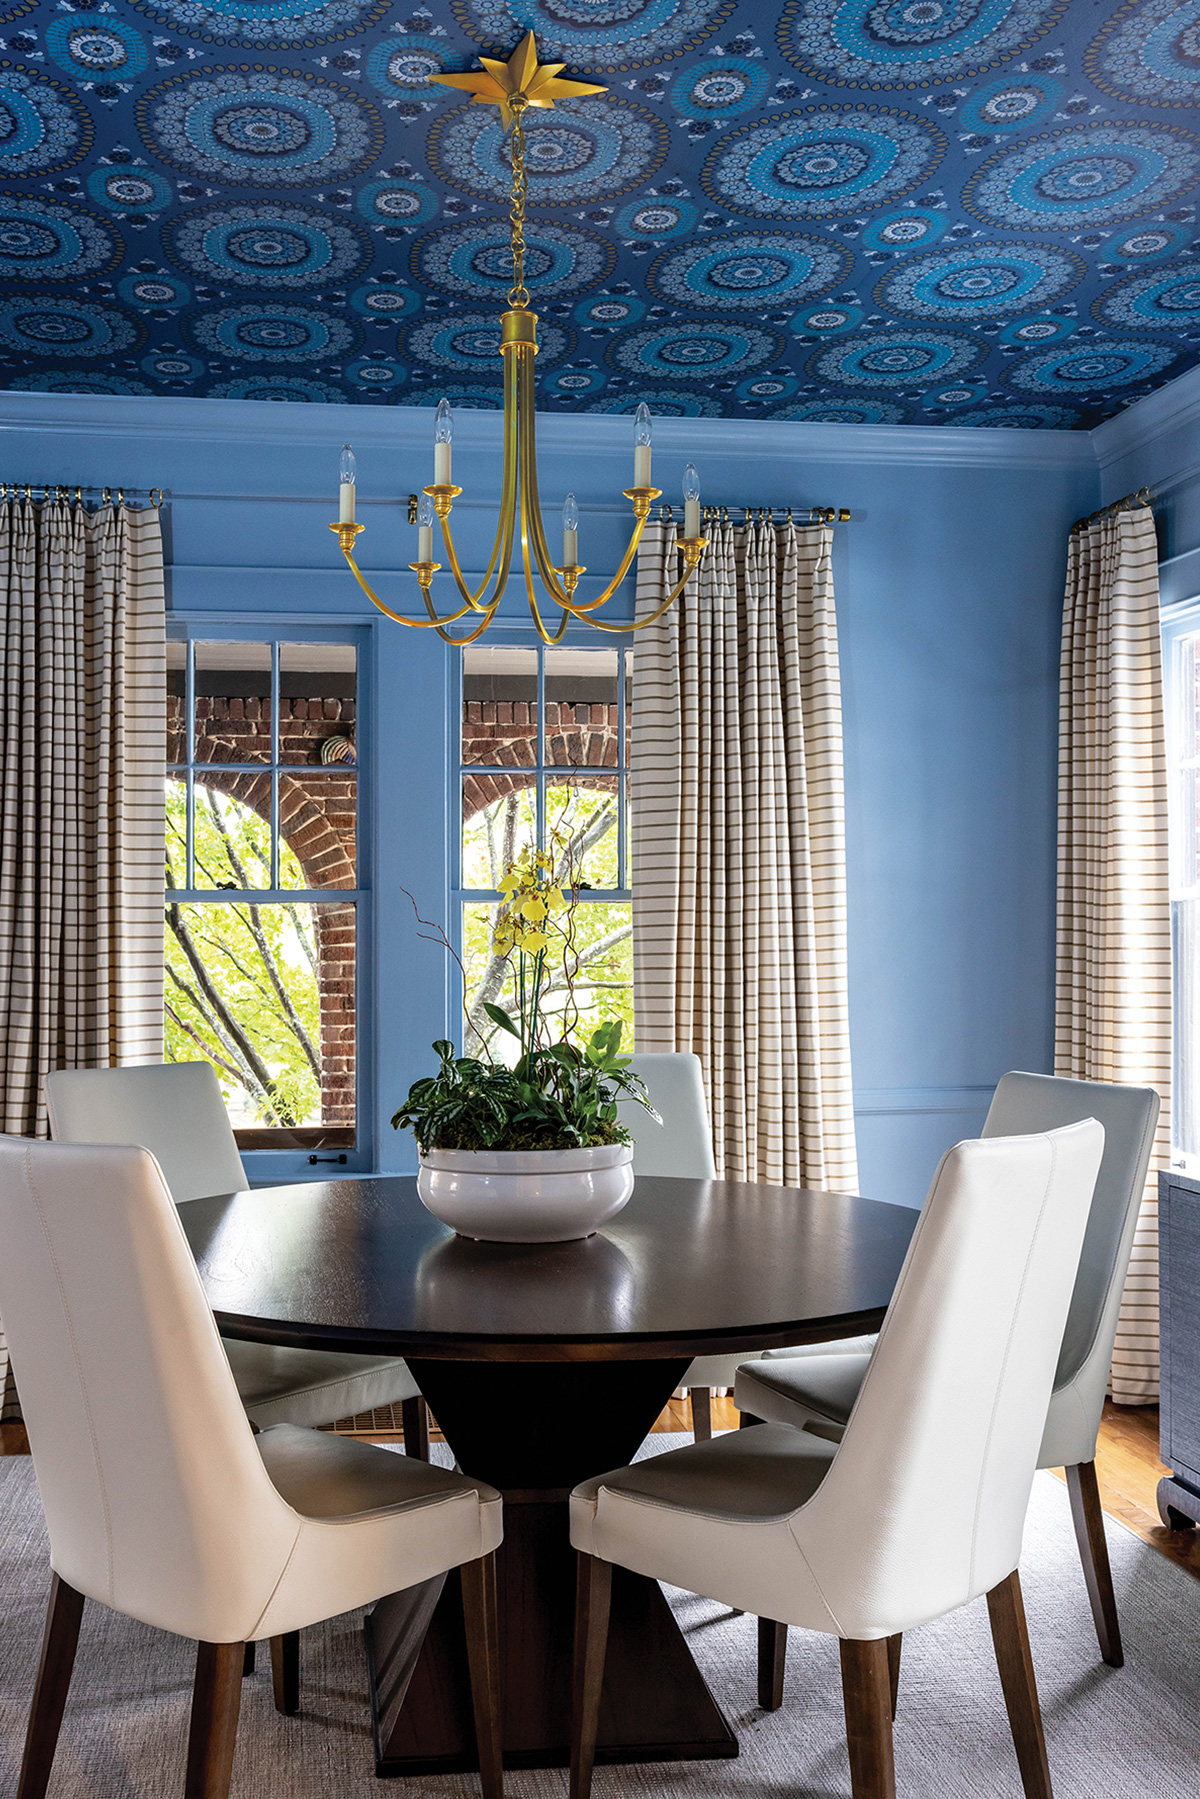
Location: Orange Beach, AL Designer: Ashley Gilbreath Photo: Laurey Glenn Featured in:Rivaling the ViewAfter her clients selected a fun patterned wallpaper for their dining room ceiling, designer Danielle Robin settled on a coordinating celestial blue color scheme for the walls and trim (Faded Flaxflower by Sherwin-Williams). The drapes have a small stripe of chartreuse, a secondary color found in the wallpaper.
Location: Homewood, AL Designer: Danielle Robin, Twin Interiors Photo: Emily Brooke Lawrence Featured in:Blue Note
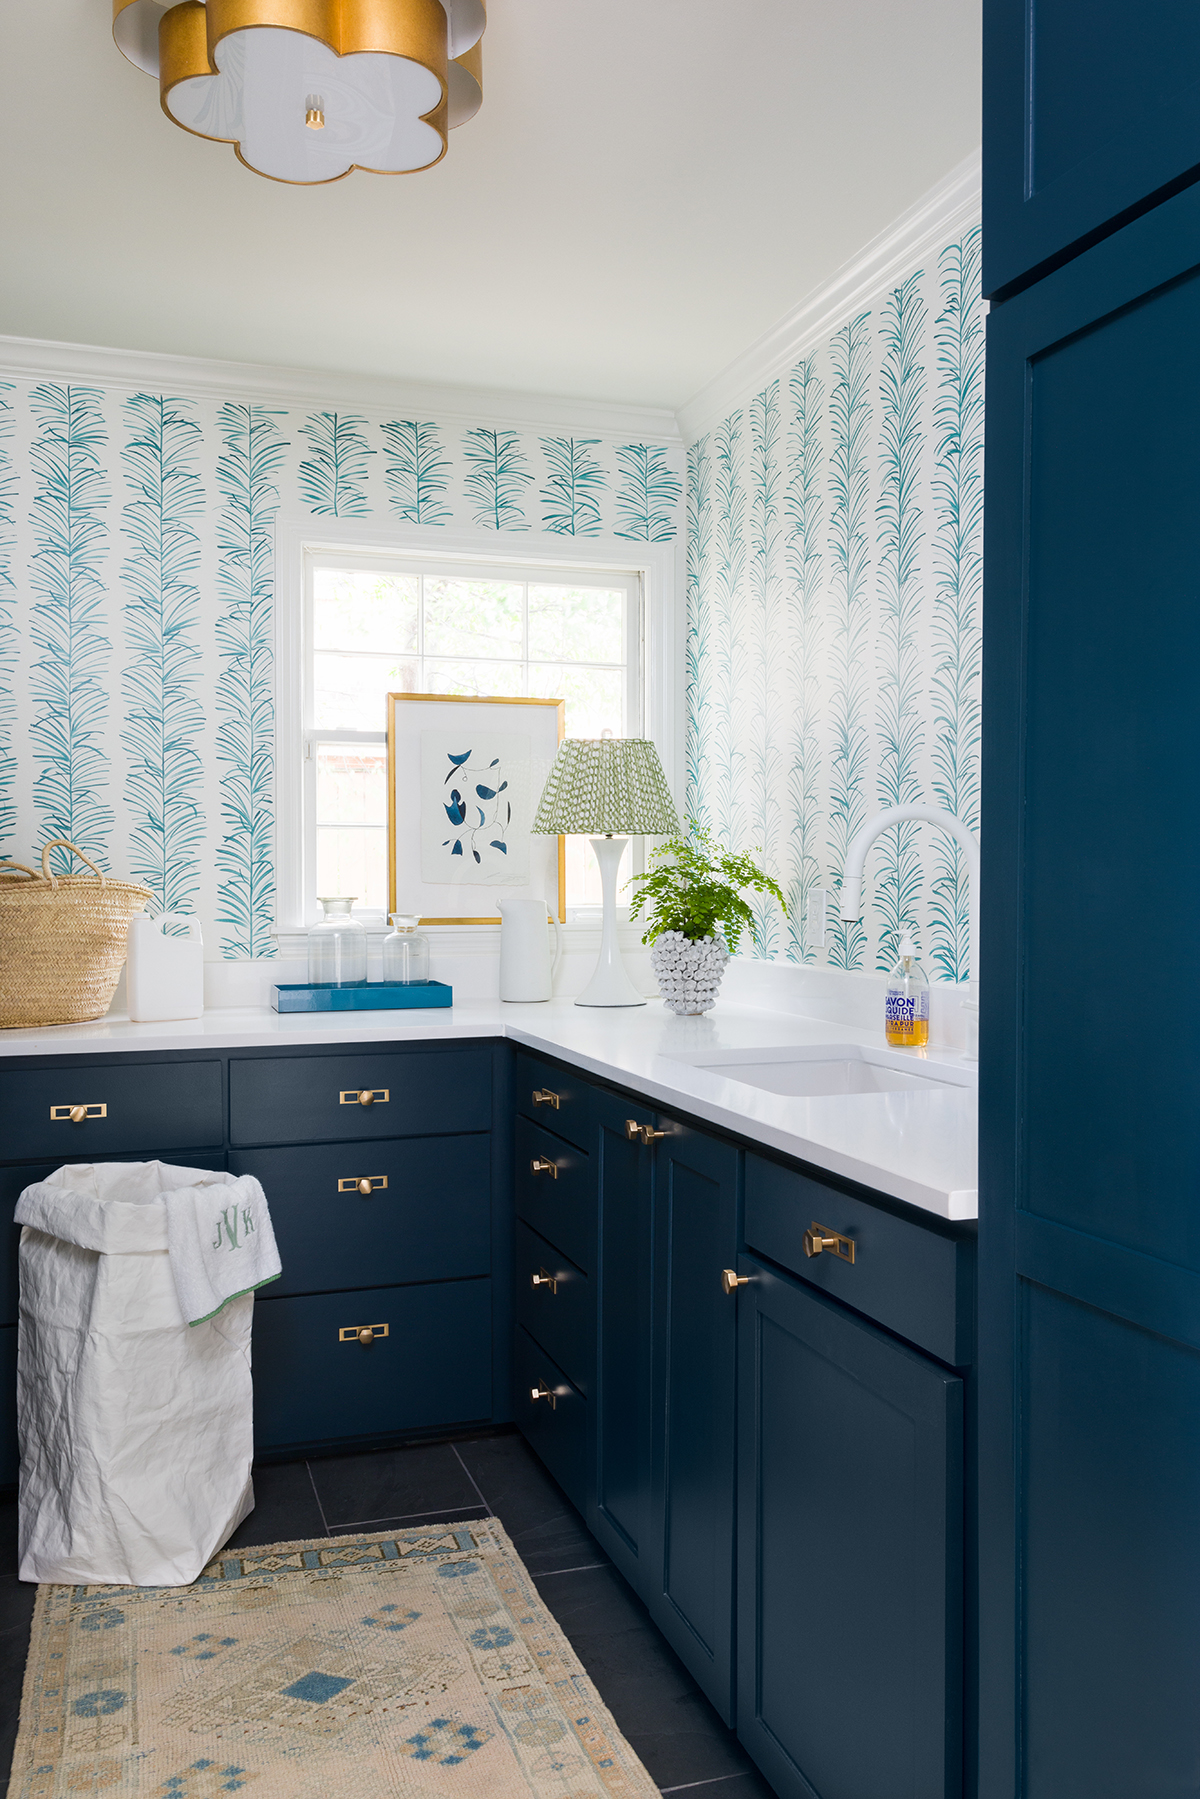
In this laundry room, designer Kelly Neely continued the blue theme used in the rest of the home, but she chose to go a bit bolder in the small space. ‘Hauge Blue’ by Farrow & Ball makes a serious statement on the flat-panel cabinets, which are topped with easy-to-clean white quartz countertops. Hand-painted walls perfectly imitate the look of wallpaper and bring another shade of blue into the space.
Designer: Kelly Neely Photo: Mary Margaret Smith Styling: Kathleen Varner Featured in: A Classic, Clean and Colorful Kitchen by Kelly NeelyDesigner Jan Ware converted this home’s designated dining room into a sitting room because of its proximity to the wine cellar. Now the owners use this space for entertaining. She added drama and depth with wainscoting and a custom blue color on the walls that matches the Hermès fabric on the bolster and dining chairs.
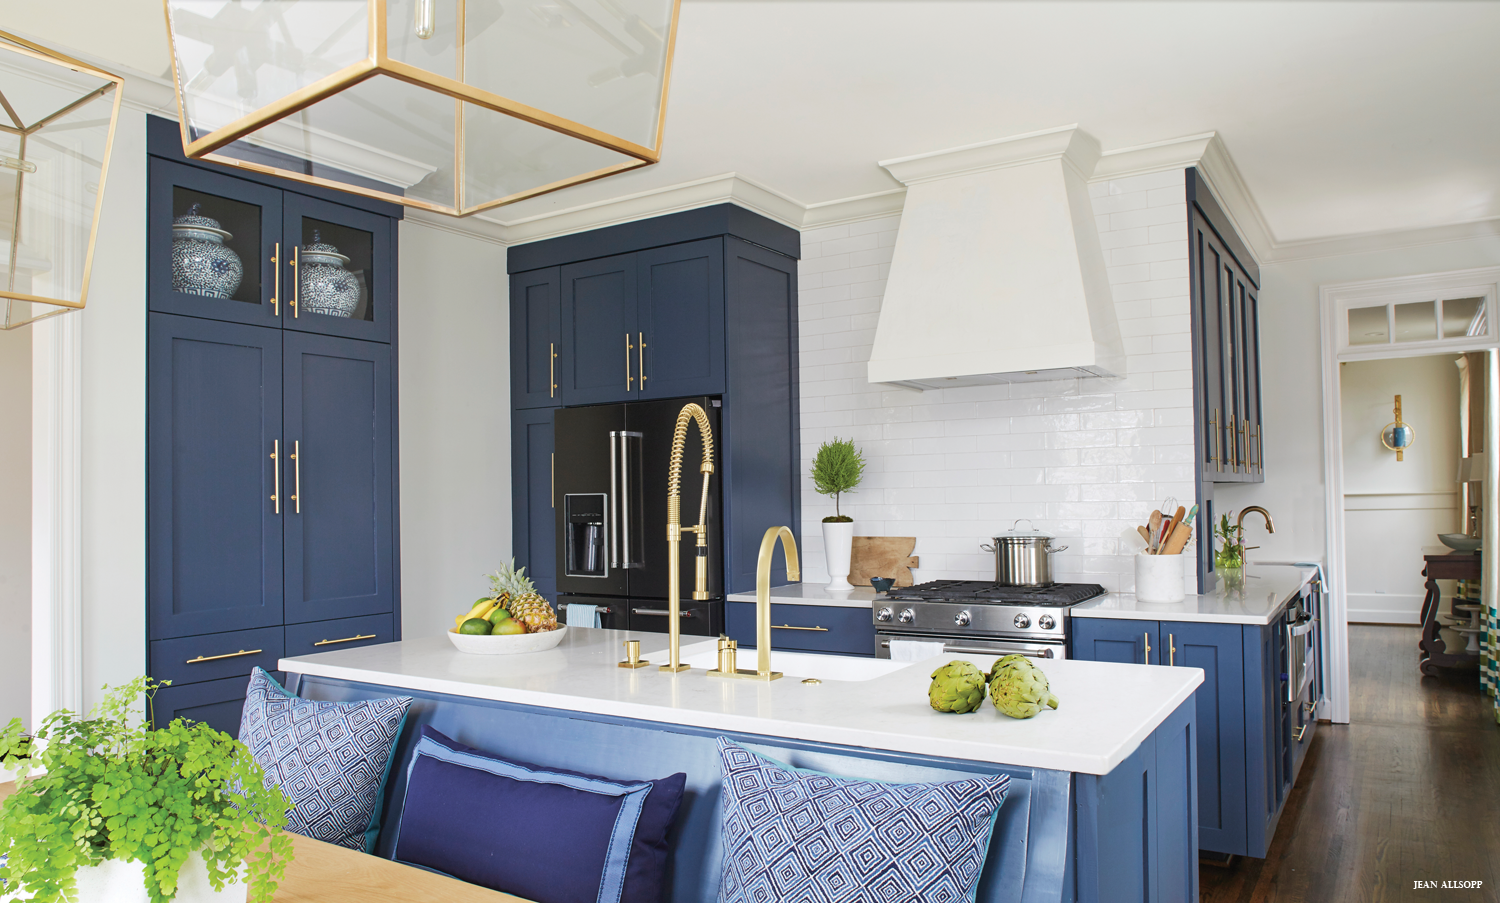
Location: Buckhead, GA Designer: Jan Ware Photo: Jean Allsopp Featured in: Designer Jan Ware Adds Bold Style to a New BuildBlue has always been designer Katie Morrow’s favorite color. So when it came time to renovate her kitchen, it was her design jumping-off point. This deep navy (Benjamin Moore Hale Navy OC-154) has a touch of gray in it and pairs well with the family’s blue-and-white dishes.
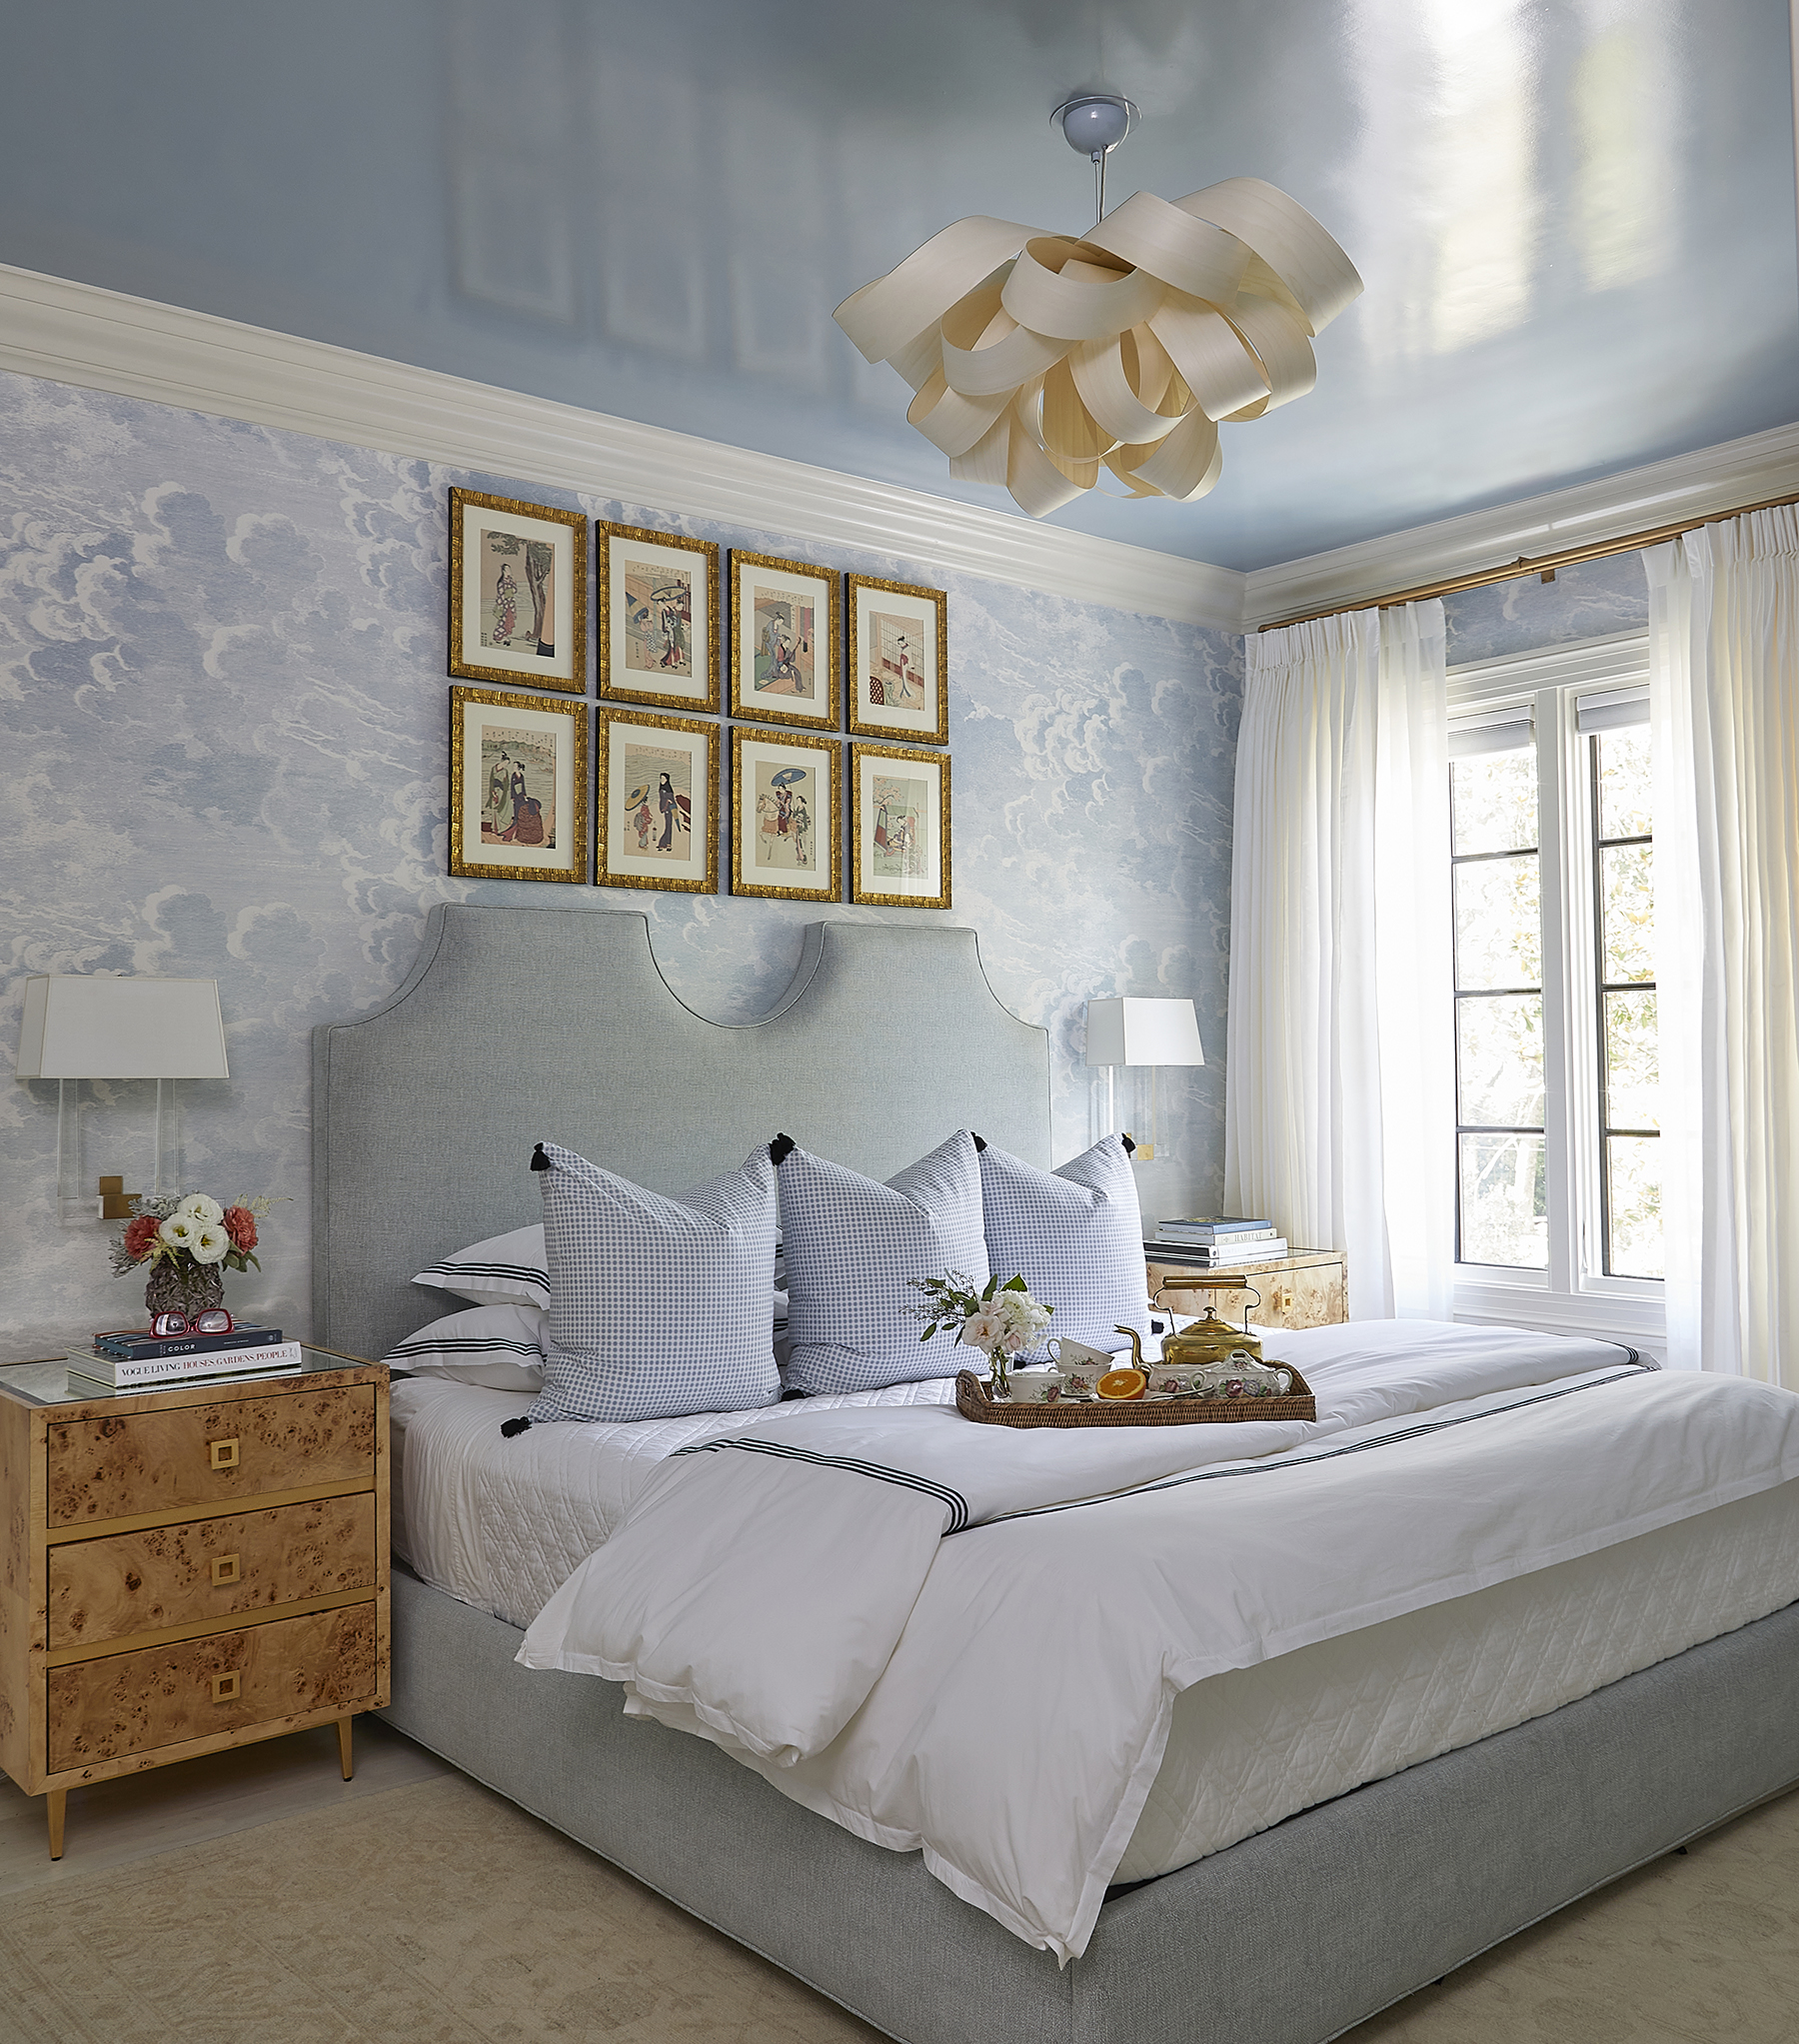
Architect: Taylor Plosser Davis Designer: Katie Morrows Photo: Jean Allsopp Featured in:Blue NoteTo mimic the reflection of the sky and pool, Kate painted the ceiling of this pool house a high-gloss blue. Cole & Sons wallpaper and a custom headboard continue the calming cerulean scheme.
Location: Mountain Brook, AL Designer: Kate Hartman Photo: Jean Allsopp Featured in:Pool House Panache
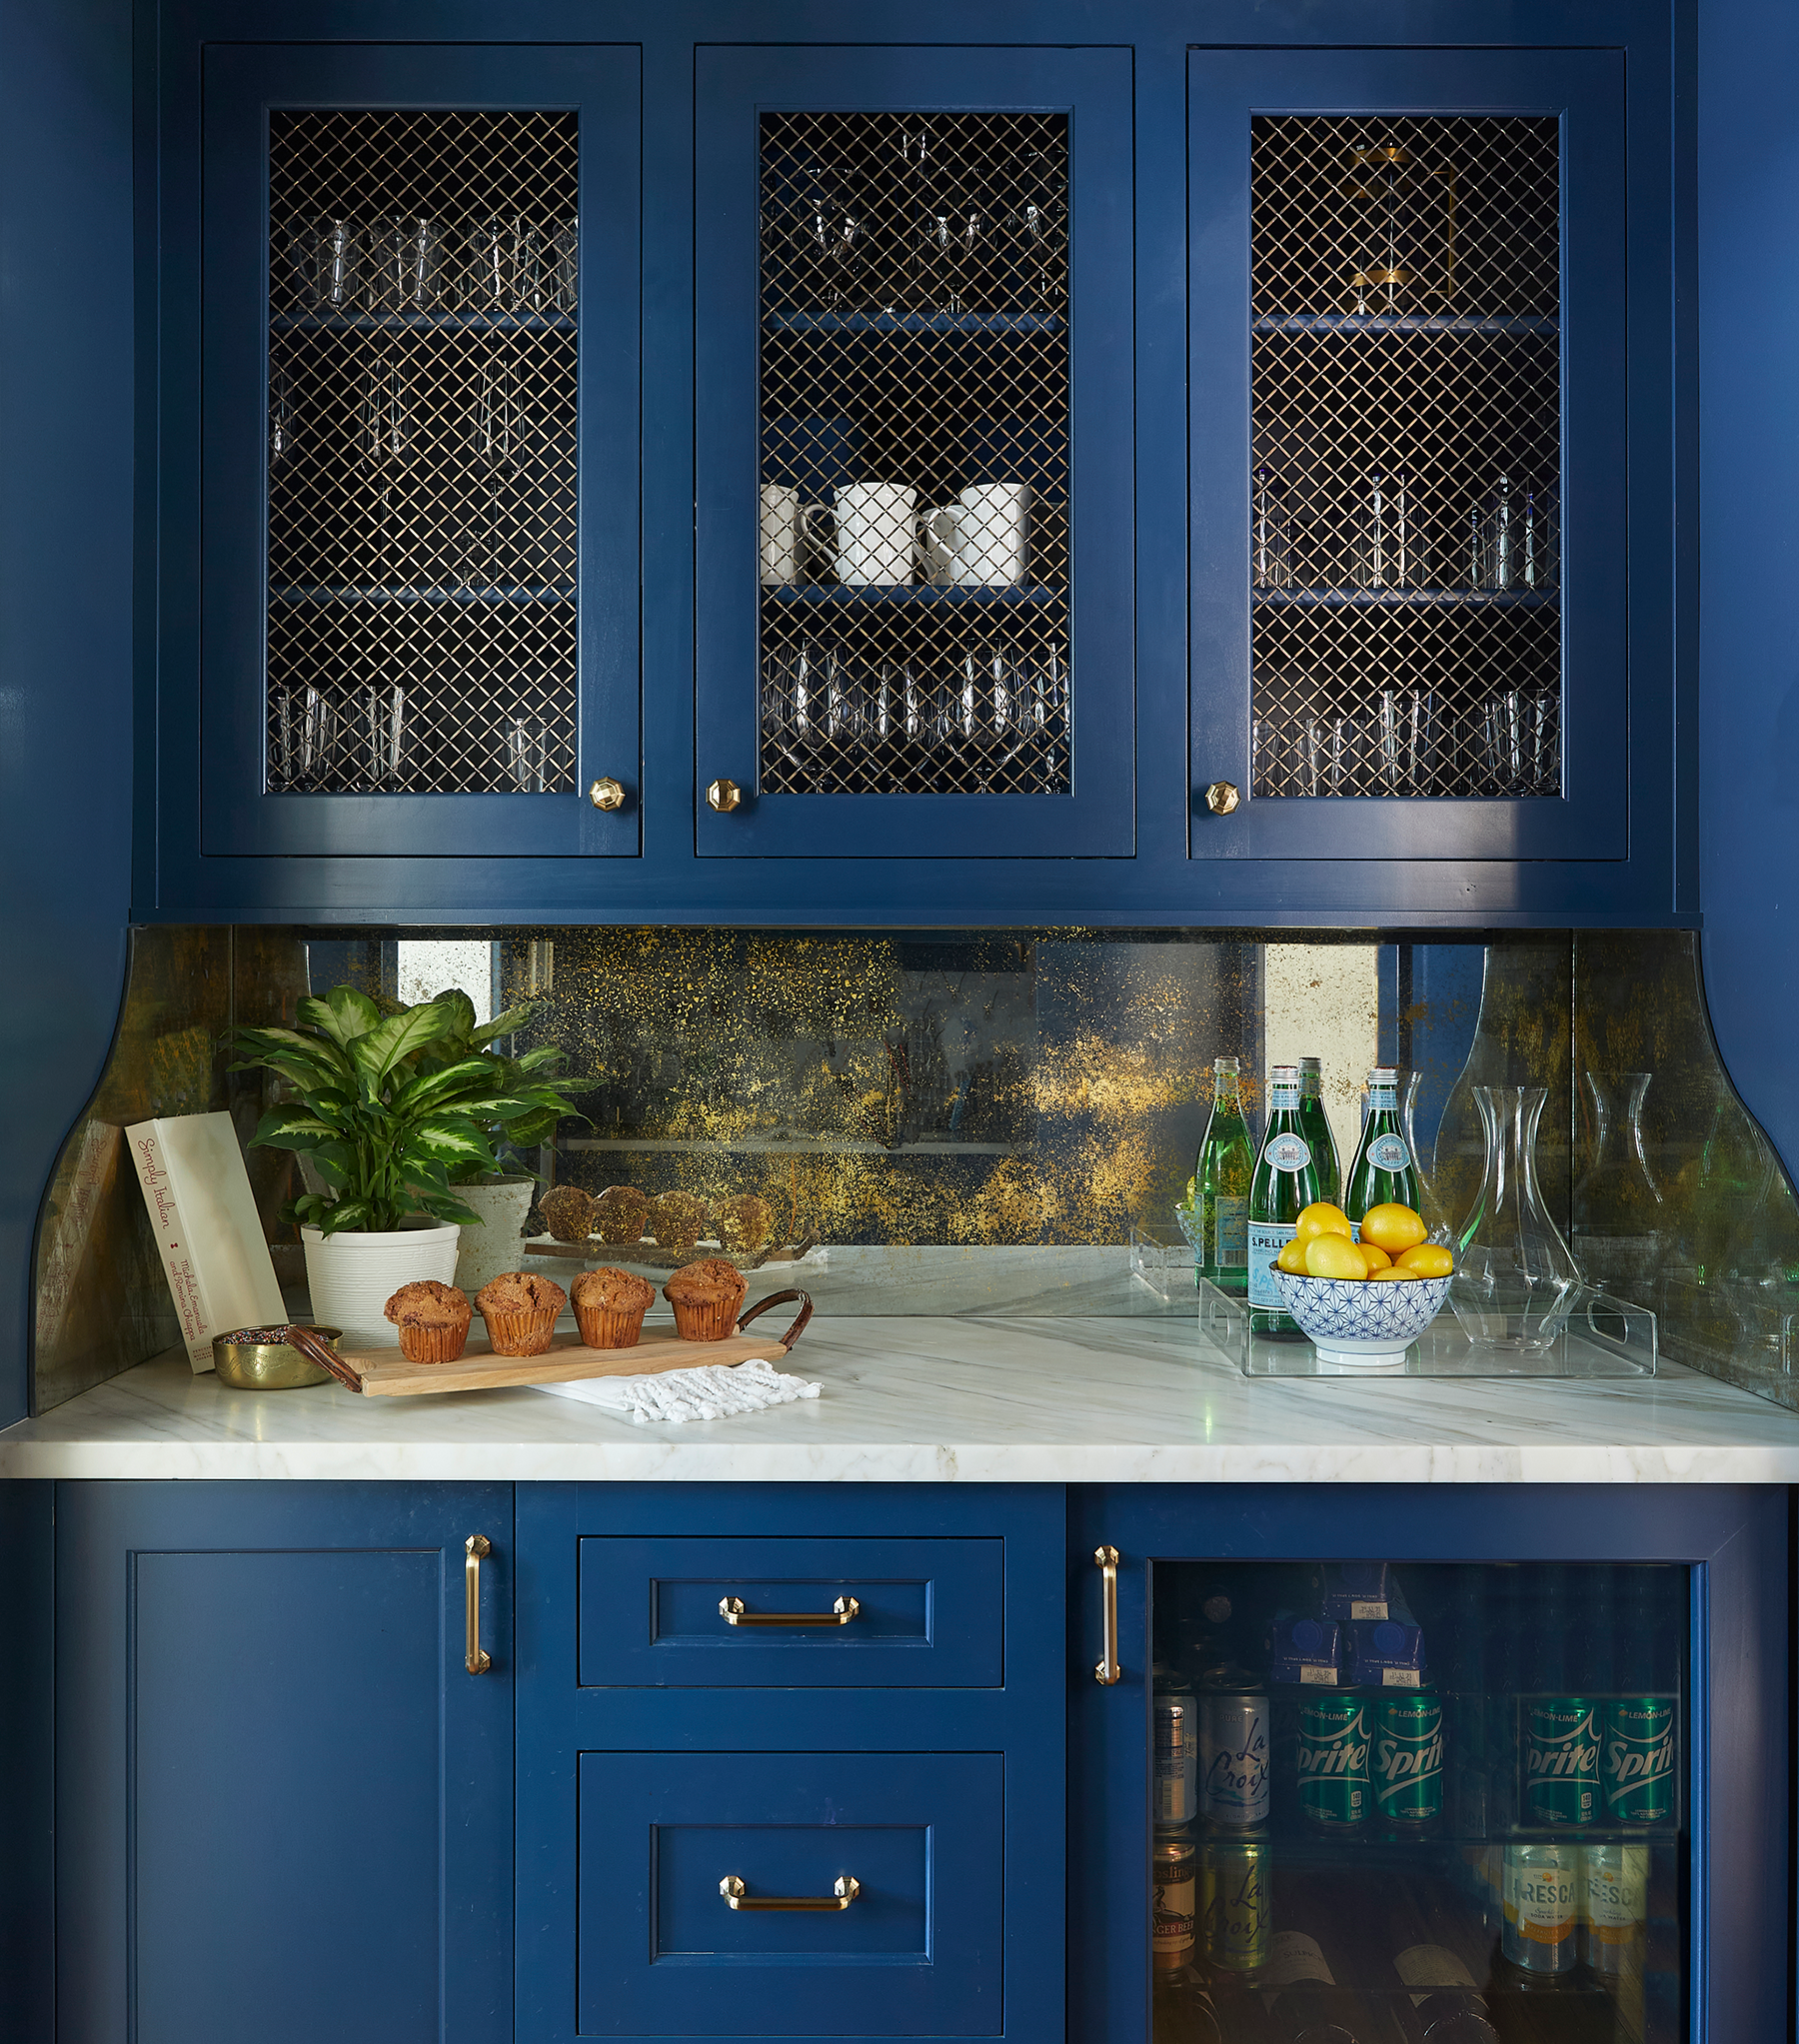
The cabinets, walls, trim, and ceiling in this butler’s pantry are all painted a bold, custom blue. For added drama, designer Kelly Butler used a high-gloss paint. “A small space like this is a great spot to be bold because you’re in and out of the space so quickly,” says Kelly. An antiqued mirror backsplash adds even more shine.
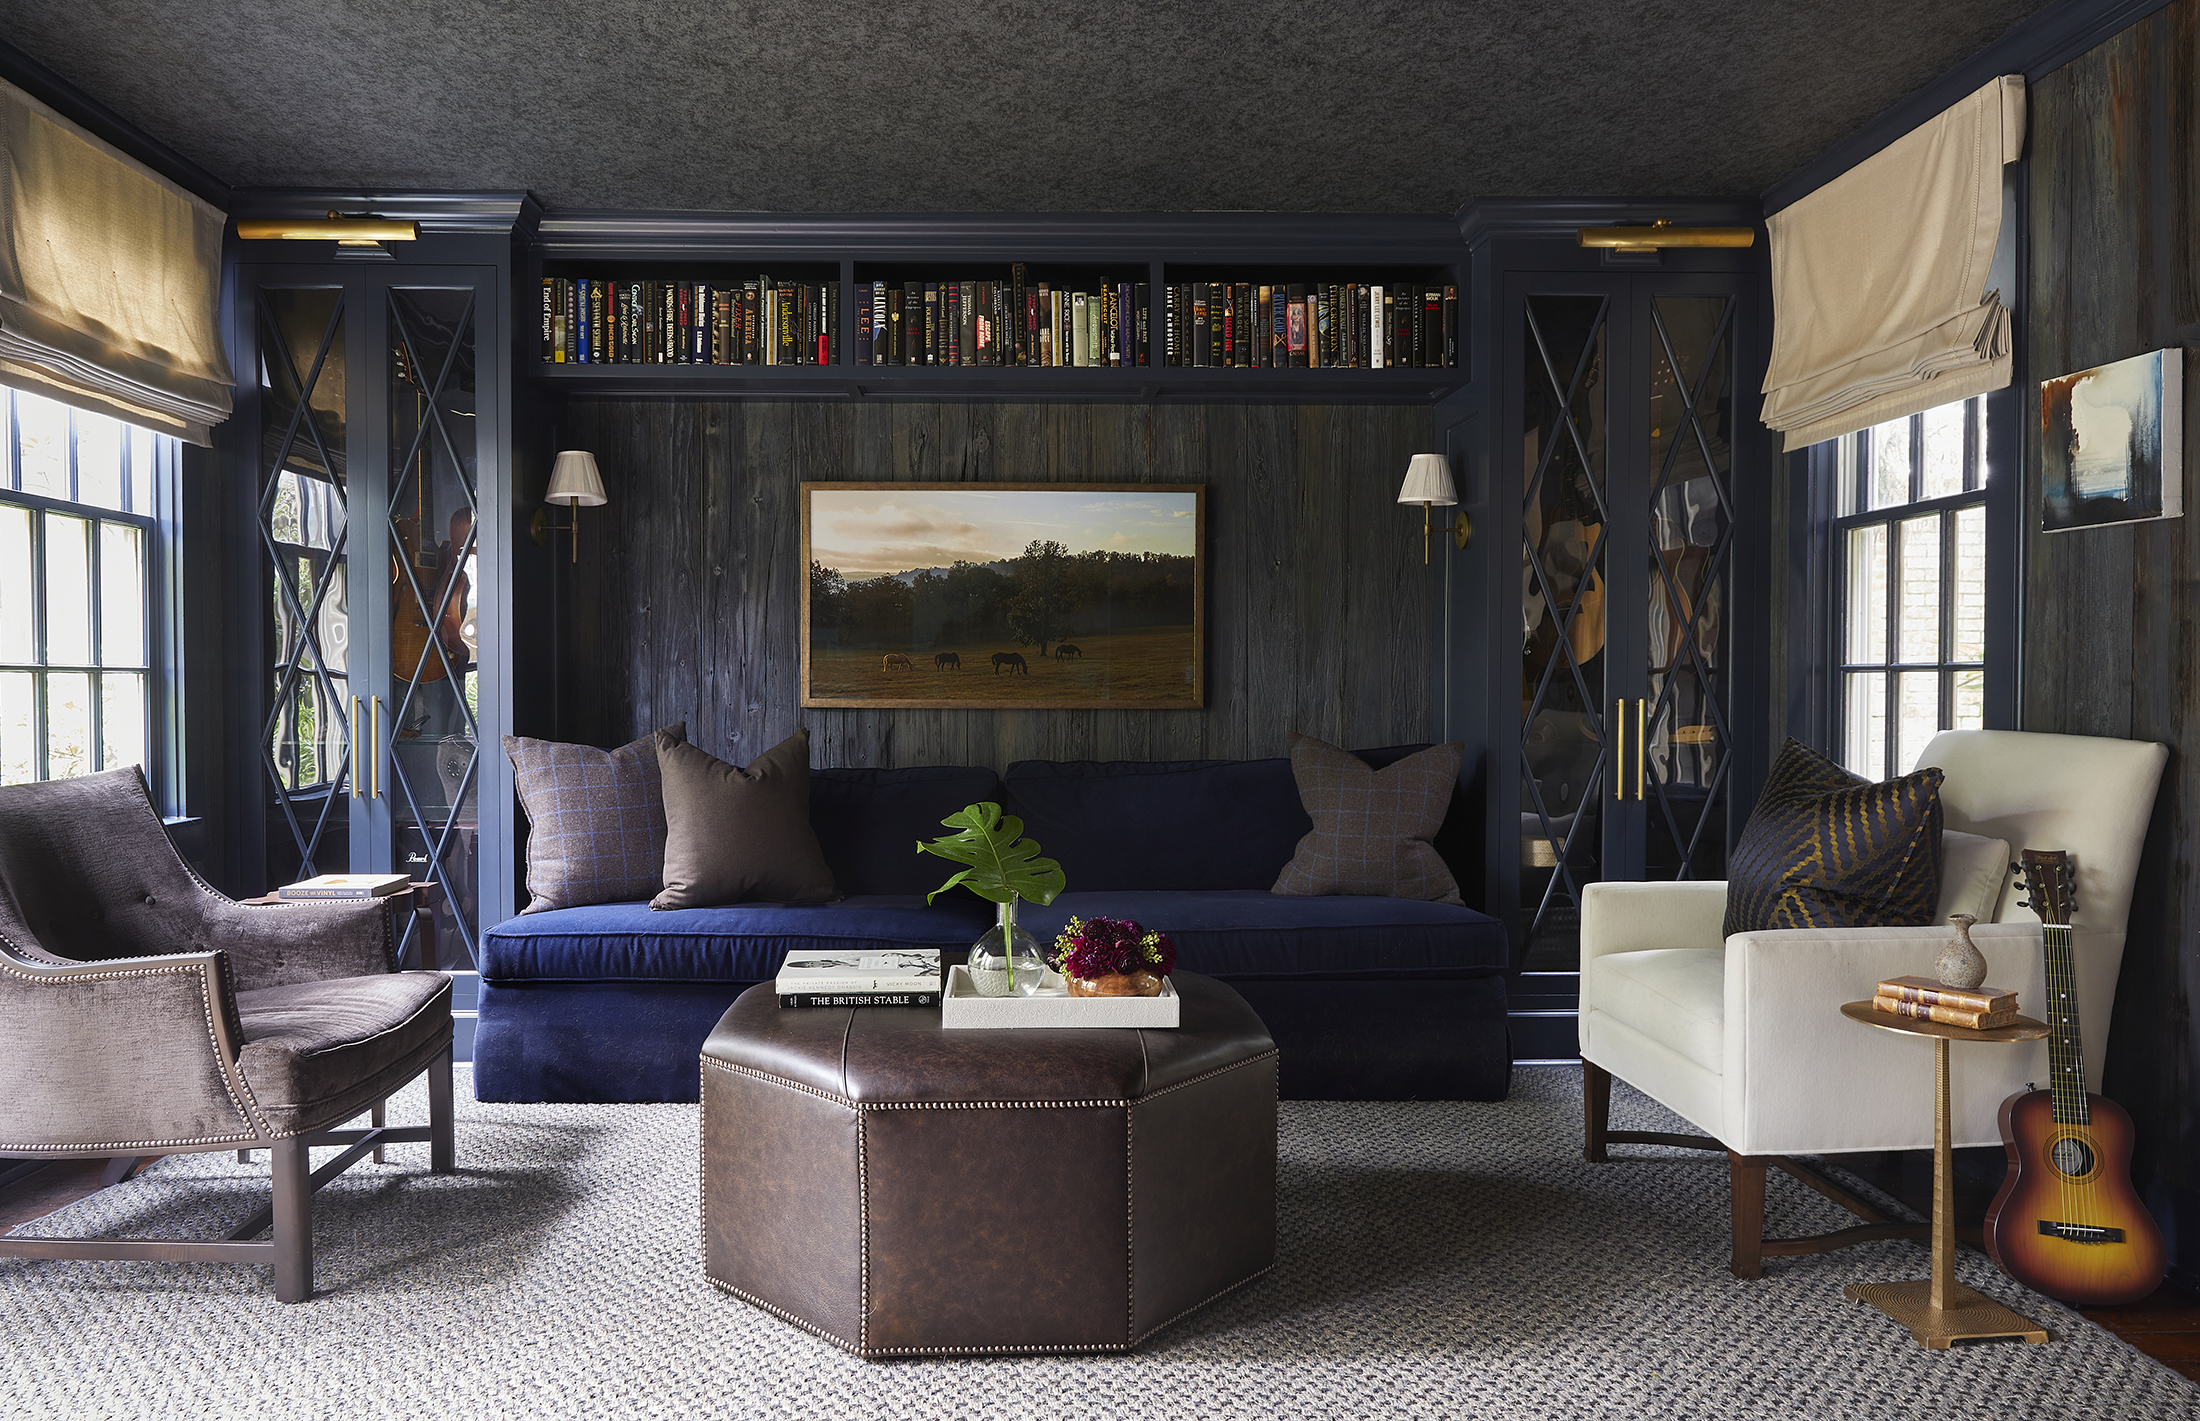
Location: Huntsville, AL Designer: Kelly Butler Photo: Jean Allsopp Featured in:Making it Personal with Kelly ButlerFor the walls of this music room, designer Dana Wolter chose to keep the room’s original paneling and update it with a darker, custom gray wash. The surrounding cabinetry and a new bar area are painted a dark, custom blue that complements the moody scene. A Phillip Jeffries snakeskin print on the ceiling adds depth.
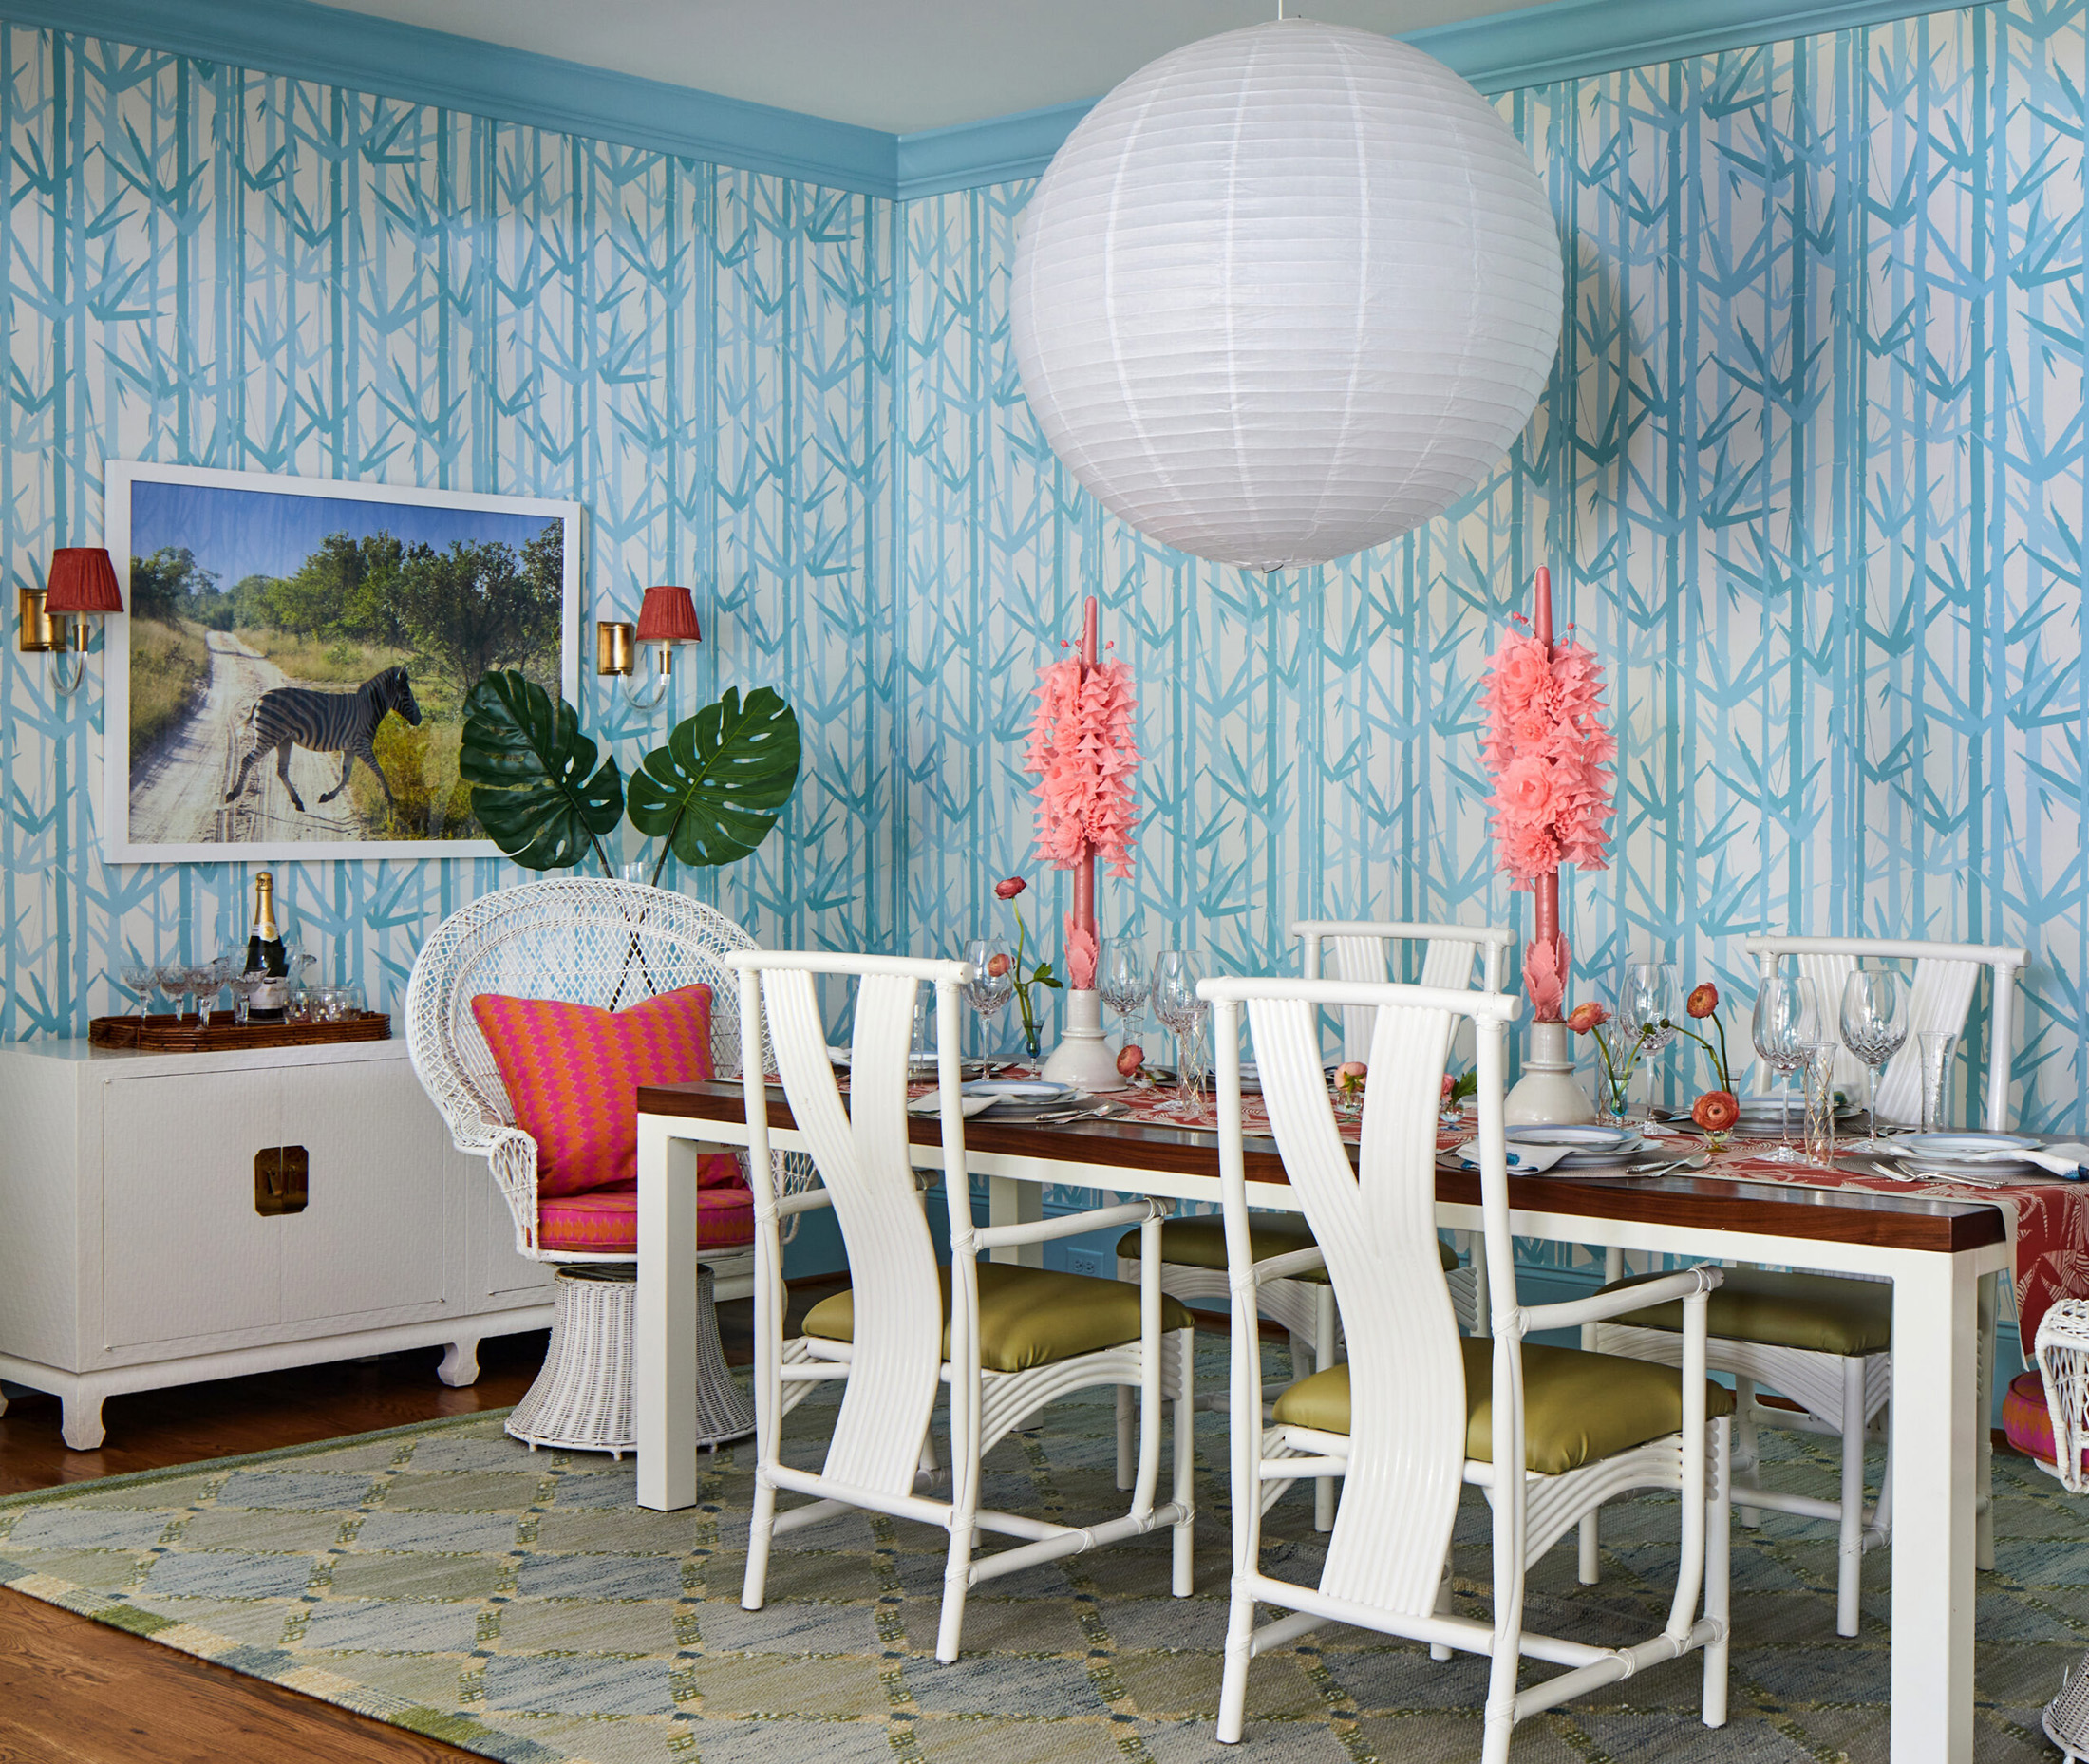
Location: Birmingham, AL Designer: Dana Wolter Photo: Jean Allsopp Featured in:Interiors Elevated“It all started with the wallpaper. My clients loved this one (Meg Braff’s Bamboo Garden in Aqua). It’s colorful, but airy enough to be really livable,” says designer Zoë Gowen, who paired the paper with some funky, 70s dining chairs painted white. She rounded out the rest of the room with simple classics from favorite local sources like a custom walnut-and-white steel dining table from Manufacture Good and the colorful flatweave from Paige Albright Orientals.
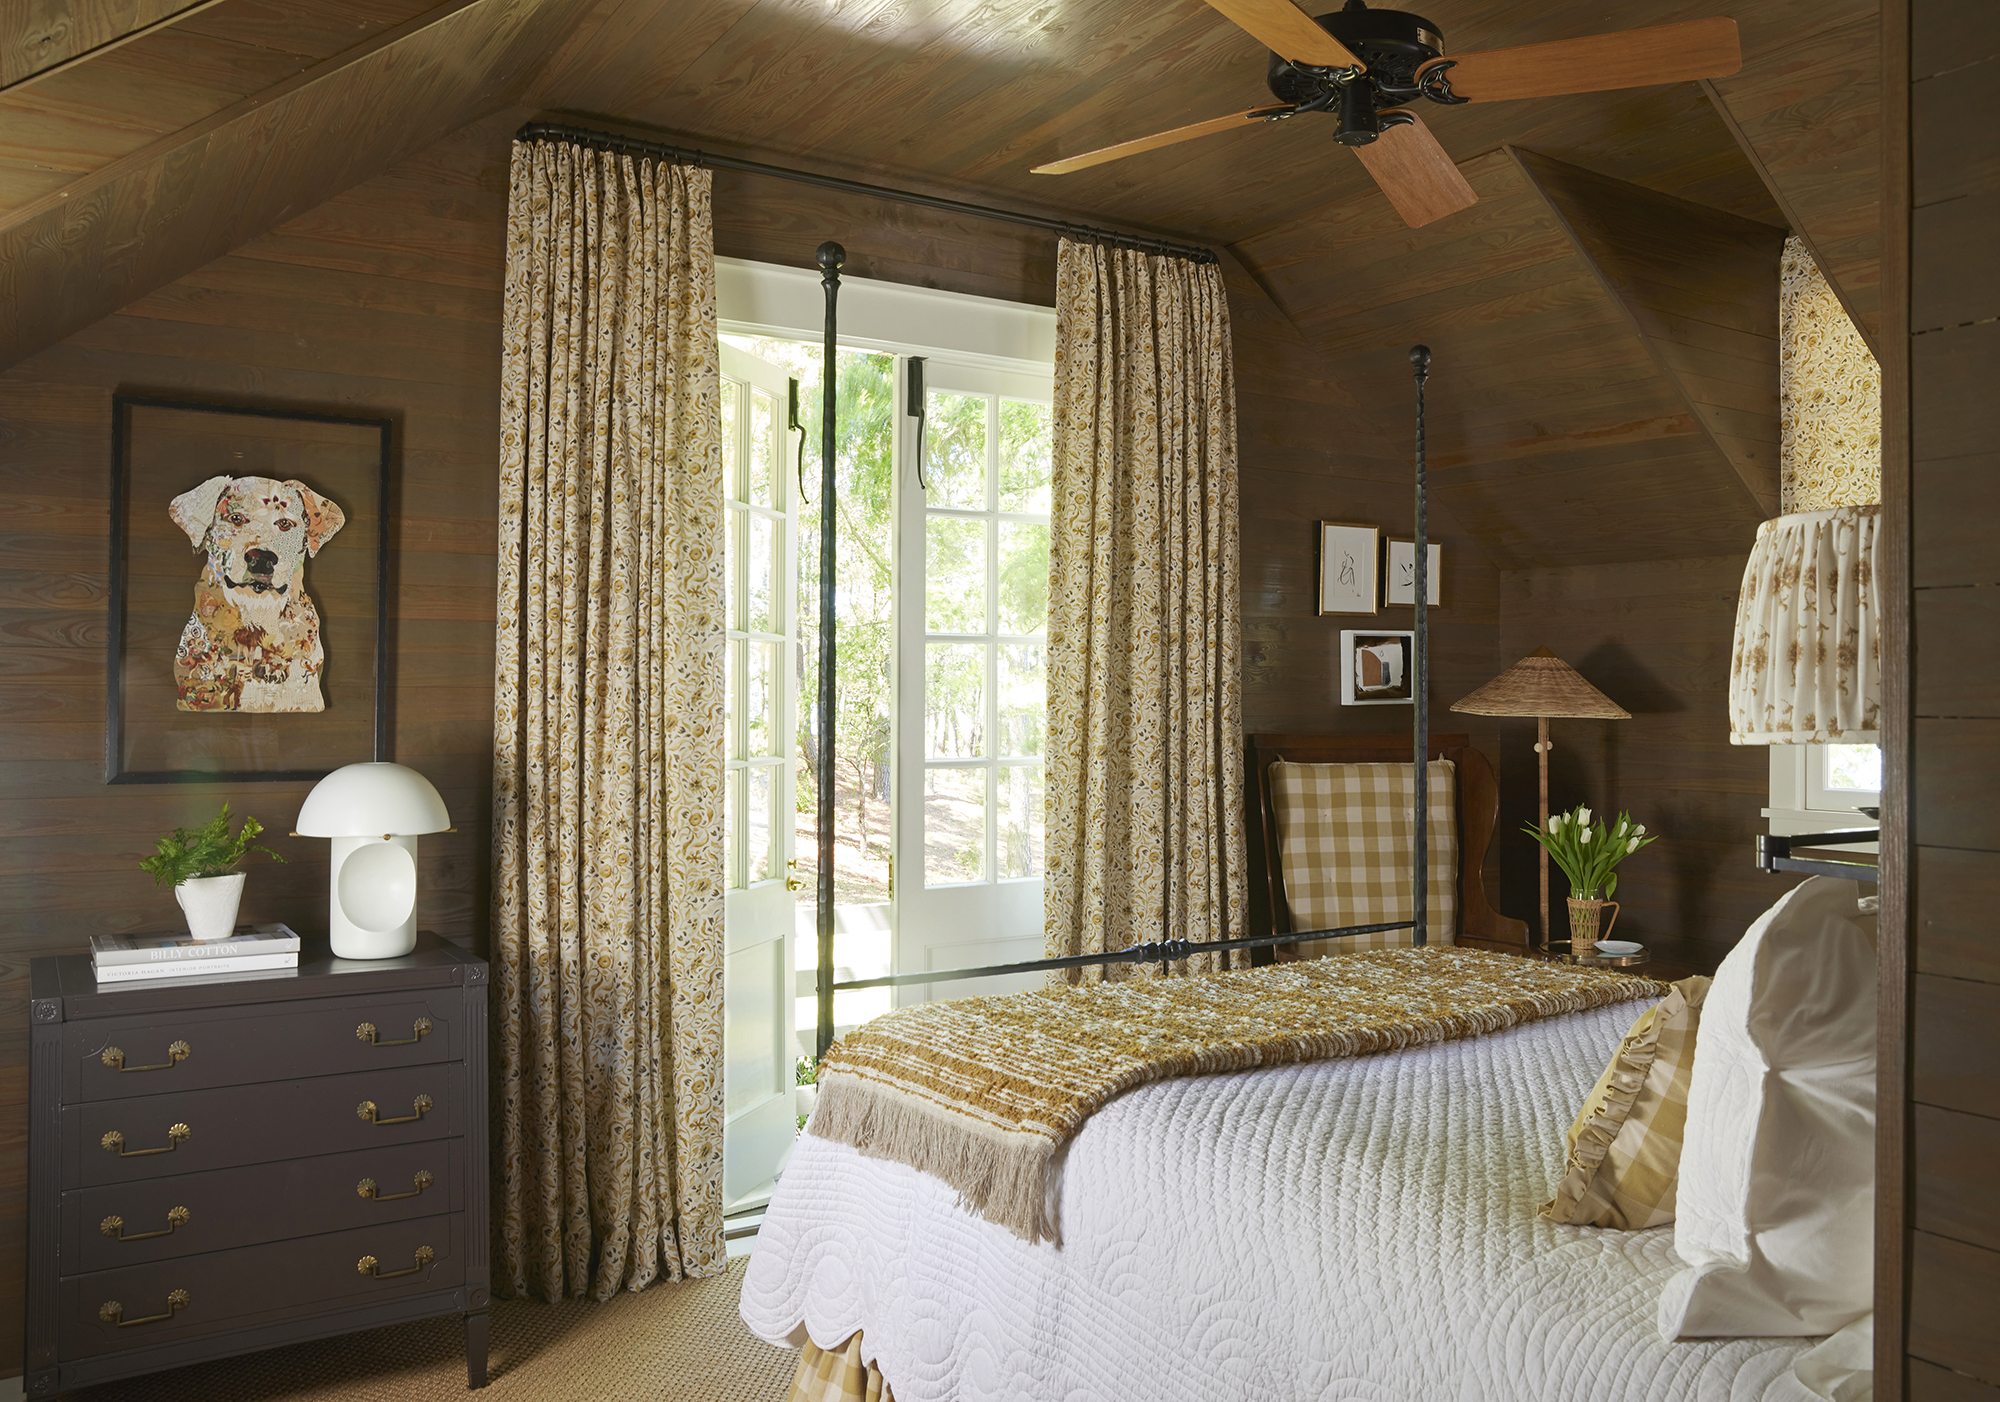
The warm, woodsy interiors of this guest house feature updated furnishings including a chest of drawers repainted in Tanner’s Brown (Farrow & Ball). The white coverlet and shams with scalloped edges set off a buffalo check accent pillow and bedskirt. Artwork is by Texas artist Brenda Bogart. Photo by Jean Allsopp
A well-appointed guest space should always come with plenty of niceties. Here are some of interior designer Farris Ann Crace’s tips for creating the warmest welcome.
Guest Space Tips
1. Stock the kitchenette with favorite beverages and snacks so guests can help themselves without having to go into the main house.
2. Include a coffee or espresso machine that uses pods—perfect for early mornings.
3. Tuck a luggage rack inside a closet. Be sure to leave a few nice hangers as well.
4. Supply fresh bathrobes and fluffy towels. And don’t forget extra hooks.
5. Fill a bathroom drawer with travel-size essentials. Luxury products are always a nice touch.
Meet Farris Ann Crace
Nashville-based designer Farris Ann Crace credits her upbringing in Mountain Brook as a big influence on the impact and importance our homes have on our lives.
“Designed correctly, interiors should elicit an emotional response—stirring up fond, old memories and inspiring new ones,” she says. “When our comings and goings are bracketed by the comfort, ease, and style of a well-designed home, I believe this enables each of us to live a more beautiful, relaxed, confident, and inspired life.”
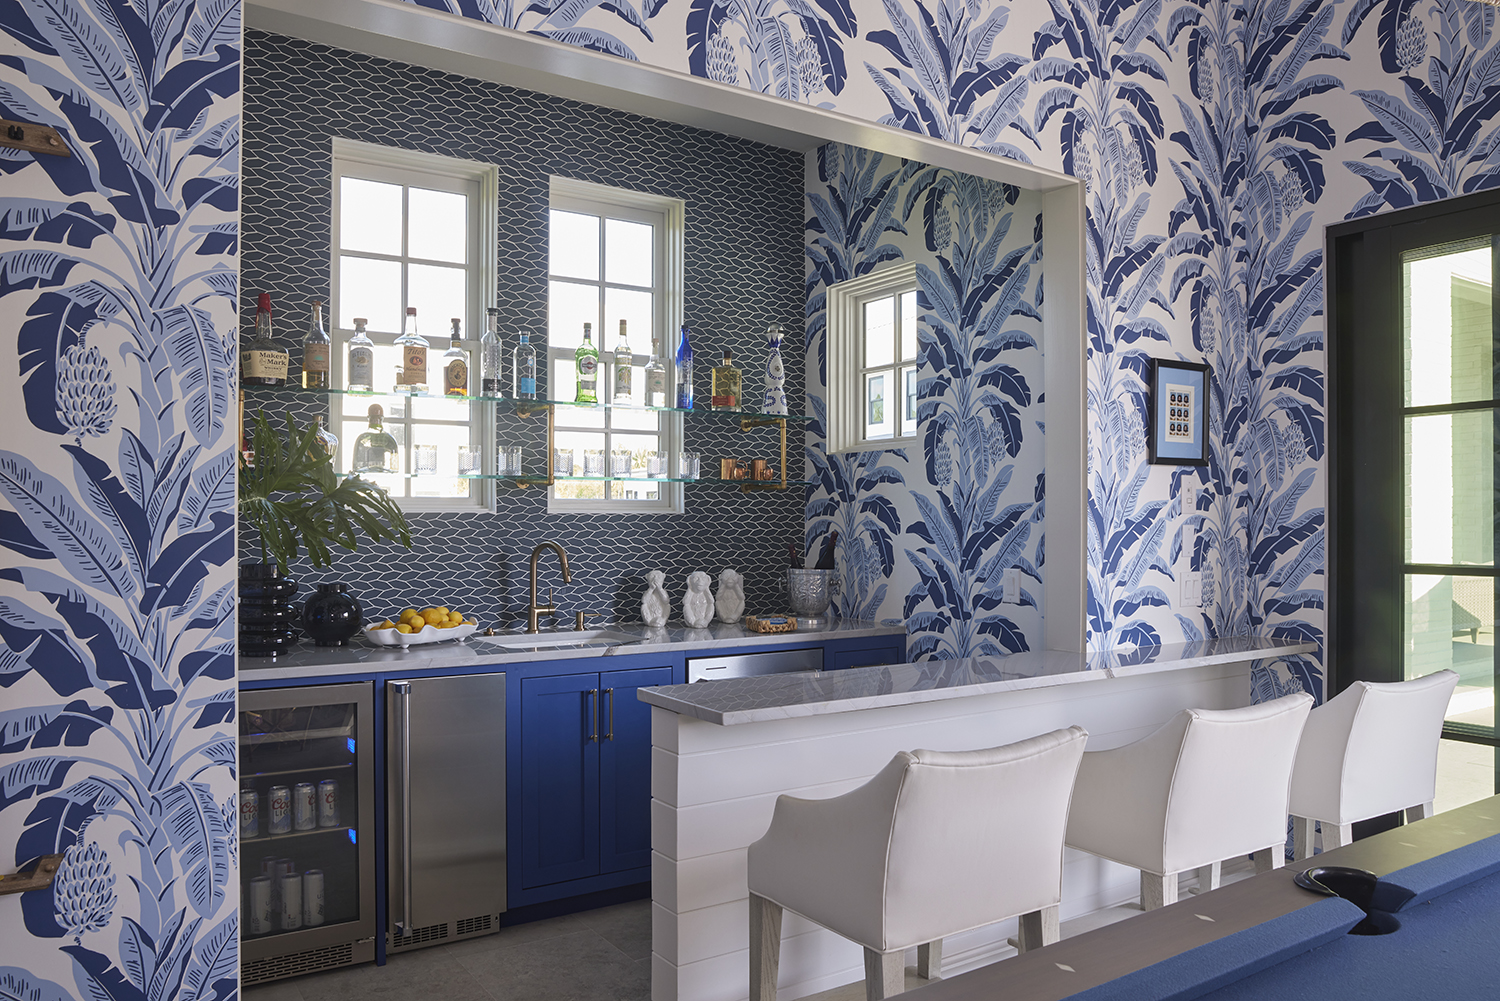
The pool house anchors the back of the property. A palm-theme wallpaper (Thibaut Banana Leaf in Navy Blue) enlivens its interiors. Outfitted with games and a fully stocked bar, the pool house is a popular gathering spot, especially when the kids are home from college. Photos by Jean Allsopp
Some houses seem to say, “Come in and make yourself comfortable.” This new build in Watersound Camp Creek, a St. Joe community with larger homesites, country club amenities, and no vacation rentals, exudes that style for year-round living.
Owners Stephanie and Tommy Lauderdale enlisted the help of residential designer Gregory Jazayeri to translate their wishes into a light and airy, family-friendly home that still holds a beach feel. Rooms flow one into the other, eliminating the need for hallways. Spaces gleam with the influx of natural daylight, and doors open up with a glorious interchange between indoors and out.
Paige Schnell and AK Porch Tisa of Tracery Interiors came on board to weigh in on finishes, fixtures, and architectural flourishes. Responding to the owners’ desire for richer warm tones, Paige drew from a palette of cinnamon reds, deep pinks, forest greens, and slate blues.
Venetian plaster walls finished in China White (Benjamin Moore) create a cool backdrop for a colorful medley of cinnamon reds, forest greens, and slate blues.LEFT: The Roseate Spoonbill painting in the foyer hallway and the landscape painting in the kitchen to the right of the scullery door are by Bellamy Murphy, bellamyart.com. MIDDLE: A paneled door in the kitchen appears as a cabinet but swings open to access the scullery. RIGHT: Painted Newburg Green (Benjamin Moore) the scullery, stocked with bar accoutrements and refreshments, has taken a more social role as a popular gathering spot during parties.Lee Industries swivel chairs in Tulum Cayenne promote conversation in both the kitchen and living area. “A circle of oversized swivel chairs is one of the most versatile furniture arrangements in an open floor plan,” says designer Paige Schnell.
The subtle colors and spirit of dressed-down elegance define the main living area where arched niches frame a contemporary fireplace. Matching sofas and a pair of occasional chairs round out the symmetrical ensemble. The two staggered conversation areas and a seagrass rug loosen up the formality.
As the bookend to this congenial open living space, the kitchen resonates with a mood that is both refreshingly modern and refined. A generous island takes center stage with the dining room opening off one end and a hidden doorway leading to a scullery/butler’s pantry on the other. Tall, narrow windows flank a sleek range hood and a marble backsplash, while a honed wooden ceiling adds warmth.
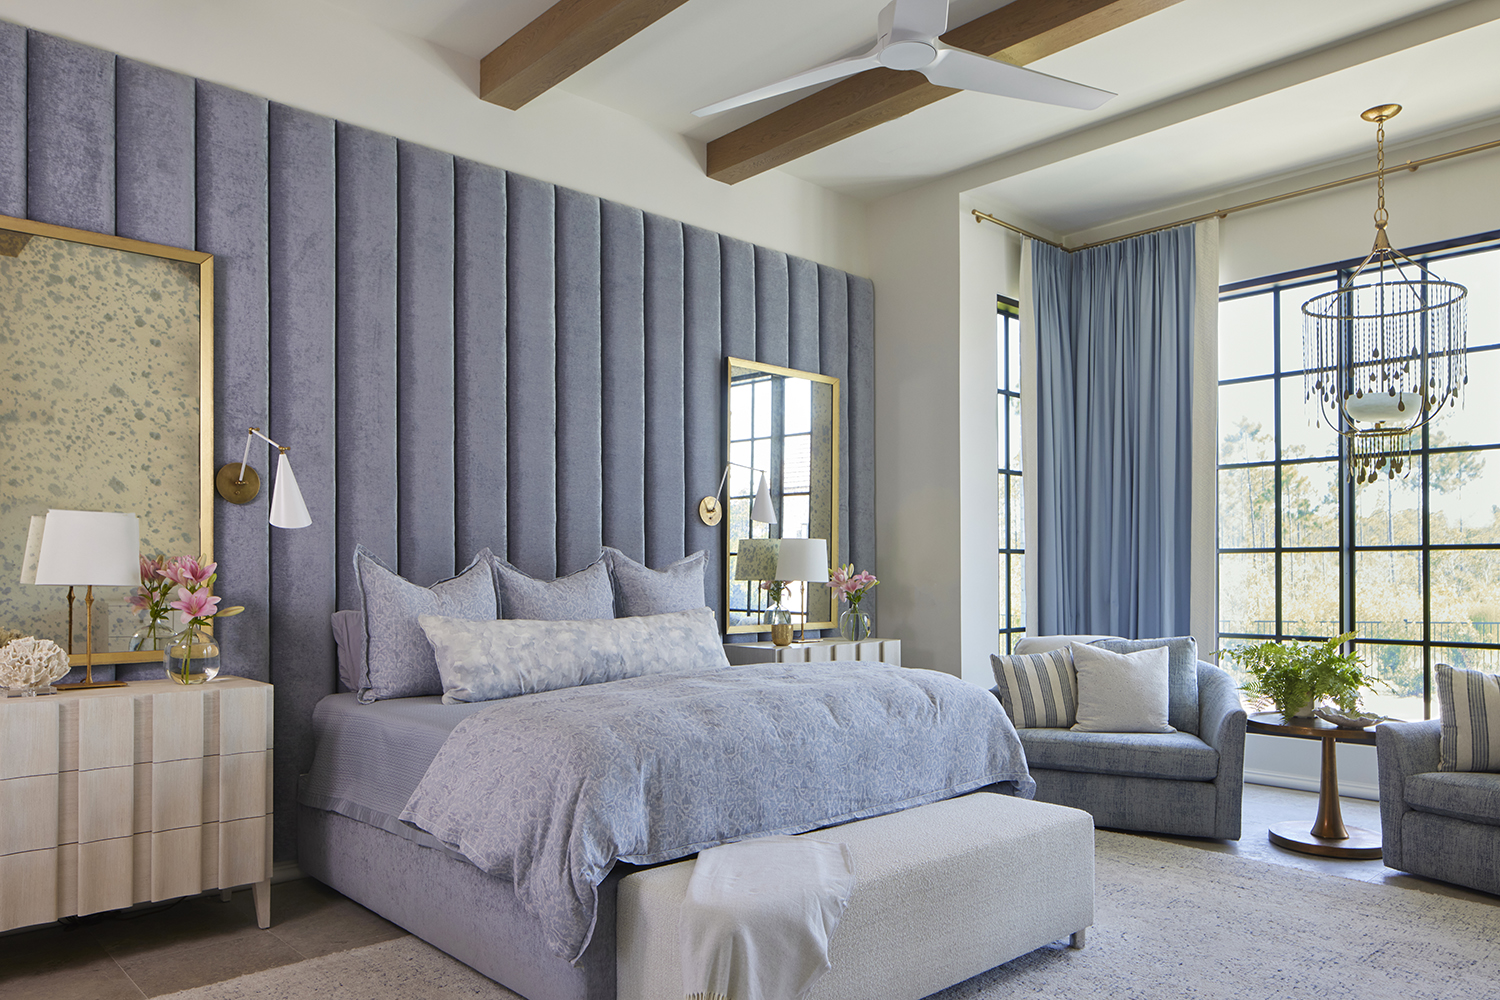
The primary wing is dressed in soothing shades of blue and gray for an expressive yet serene mood.LEFT: Rich finishes and a textured wallcovering (Arpora Catmint by Innovations) help the primary bath evoke a spa-like mood. RIGHT: Fanciful flamingo wallpaper brings cheer to a powder bath.
The home’s subtle blend of ease and sophistication is perhaps most eloquently executed in the primary suite, where the clients’ directive was the feel of a five-star hotel. Shades of slate blue and soft grays are a study in serenity. A recessed bay with tall windows carves out a sunny nook large enough to accommodate two oversized chairs and a focal chandelier. Floor-to-ceiling blue linen draperies frame views of the landscape while exposed wooden beams animate the ceiling. The crowning jewel is a luxurious upholstered wall that serves as a commanding headboard. Symmetrical bedside tables and sleek, gold-framed mirrors are pretty and practical.
Savoring the best of outdoor living is a large part of this home’s allure. The Lauderdales love to throw open the doors and let the fun commence. As Stephanie says, “Along 30A, everyone’s lifestyle is a lot more relaxed.”
Find your place at Watersound Camp Creek
Watersound Camp Creek is South Walton’s newest residential community offering a desirable location with large homesites and impeccable amenities. Residences are situated adjacent to Camp Creek Golf Club and within a short car, bike, or golf cart ride to Scenic Highway 30-A, the Gulf of Mexico, and the Watersound® Town Center. Visit joe.com for more information.
Resources
Interior Designers: Paige Schnell and AK Porch Tisa of Tracery Interiors; Rosemary Beach, Florida; traceryinteriors.comBuilder: Regal Stephens Builder-Developer; Santa Rosa Beach, Florida; regalstephens.com
The versatility of these spring recipes make them perfect for brunch, lunch or dinner. Serve straight off the stove, or plate on a formal table in your dining room for an elegant Easter celebration.
The deviled eggs and asparagus roll-ups can serve as appetizers or accompany the salad. The Grecian Orange Cake starts with a cake mix (my kind of baking!) and can be made a day or two ahead.
It just gets moister! For the Lowcountry Shrimp and Grits, I buy my shrimp peeled and deveined to save time. Be sure to have all the vegetables chopped and the remaining ingredients measured out and ready to go. It helps this recipe come together quickly.
Have fun with this menu. It’s a very doable feast that welcomes spring in the most delicious way!
Audrey’s Grecian Orange Cake
CAKE: 1 box moist yellow cake mix 1 small package instant lemon pudding 4 large eggs 3/4 scant cup salad oil 3/4 cup water
ICING: 2 tablespoons butter 2 cups powdered sugar 3 to 4 ounces orange juice concentrate
Preheat oven to 325 degrees.
Beat all ingredients on low speed in an electric mixer for 2 to 3 minutes. Pour batter into a greased and floured Bundt pan. Bake for 45 minutes.
To prepare icing: In a small saucepan, melt butter; then add sugar and orange juice. Stir until warmed and thoroughly combined.
Remove cake from the oven; with a wooden skewer, punch 100 holes through to the bottom. Pour icing over cake, and unmold when almost cooled.
Butterhead and Arugula Spring Salad
SERVES 4
DRESSING: 2 teaspoons Dijon mustard 2 tablespoons red wine vinegar 1½ teaspoons honey 1 garlic clove, finely chopped 1 small shallot, minced Kosher salt and freshly ground black pepper ¹⁄³ cup extra-virgin olive oil
In a medium bowl, combine the first 6 ingredients. Add olive oil in a slow stream, and whisk to emulsify quickly. Set aside.
SALAD: 1 head butter lettuce, leaves separated 3 cups lightly packed arugula, about 3 ounces 3 radishes, very thinly sliced 2 teaspoons pink or rainbow peppercorns, lightly crushed ½ cup salted and roasted Marcona almonds, coarsely chopped ½ cup freshly grated Parmesan cheese
In a large bowl, combine the butter lettuce (tear any extra-large pieces into bite-size pieces), arugula, radishes, and half of the peppercorns, almonds, and cheese. Drizzle half of the dressing around the sides of the bowl, then use tongs to lightly toss the salad. Do not overdress this salad.
Transfer salad to a large platter, drizzle with remaining dressing, and top with remaining half of peppercorns, almonds, and cheese. Serve immediately.
Deviled Eggs
MAKES 12
6 large eggs 2 tablespoons mayonnaise 1 teaspoon Dijon mustard Dash of Worcestershire sauce Dash of hot sauce Garnishes: pickles, capers, radishes, bacon, cheese, jalapeños, fresh herbs, celery, and olives (or whatever you have on hand). Get creative!
Bring a medium-size saucepan to a boil. Gently place the eggs into the pan. Boil for 15 minutes; remove from the stove, and run cold water into the pan. Remove eggs, and allow them to cool for 15 minutes.
Peel eggs, discarding the shells. Cut eggs in half lengthwise; remove yokes, and place in a small bowl. Add remaining ingredients, and fill each egg half with mixture. Garnish and chill until ready to serve.
Lowcountry Shrimp and Grits
SERVES 4 TO 6
CHEESE GRITS: 2 cups water 2 cups whole milk 1 teaspoon salt 1 cup stone-ground yellow grits 2 tablespoons butter 1 cup shredded Cheddar cheese
Bring water and milk to a boil over high heat. Add salt to the water, and stir in grits. Lower heat to medium-low, and simmer until cooked, stirring frequently. Refer to the package directions for cooking time. Remove from the heat, and stir in butter and cheese.
SHRIMP MIXTURE: 1 pound large shrimp, peeled and deveined Salt and pepper to taste 1 tablespoon Creole seasoning, divided 4 tablespoons butter, divided 8 ounces Conecuh sausage, sliced 1/2 small onion, diced 1/2 red pepper, diced 1/2 green pepper, diced 2 stalks celery, diced 4 garlic cloves, finely chopped 2 tablespoons flour 1 cup low-sodium chicken broth Salt and pepper to taste 2 tablespoons heavy cream
Season the shrimp with salt, pepper, and 1 teaspoon of Creole seasoning. Add 2 tablespoons of the butter to a skillet over medium-high heat. Cook shrimp about 2 minutes per side, until they are pink and opaque. Remove to a plate.
Add the sausage to the skillet, and cook until browned on both sides. Remove to plate.
Add the remaining butter to skillet, along with diced onion, pepper, and celery. Sauté until softened.
Add in garlic, flour, and remaining Creole seasoning. Stir until well combined. Gradually add in chicken broth, continuously stirring. Bring to a low boil, reduce heat, and simmer 10 to 15 minutes. Taste gravy, and add additional salt and pepper, if desired.
Stir in the shrimp and sausage, along with the cream. Cook everything together for a minute or two, then serve over grits.
In a large saucepan, bring 1/2 inch of water to a boil. Add asparagus; cover and boil for 3 minutes. Drain and immediately place asparagus in ice water. Drain and pat dry. Set aside.
Flatten bread with a rolling pin. Spread a thin layer of cream cheese on each slice of bread. Top with an asparagus spear. Roll up tightly with seam side down on a parchment-lined baking sheet.
Cut roll-ups into thirds, and brush with melted butter. Place baking sheet into freezer for about an hour until butter coating is chilled. Place in a zip-top plastic bag until ready to bake. If roll-ups are not frozen, bake at 400 degrees for 10 to 12 minutes.
Note: These can be made two weeks ahead and frozen. When baking from the freezer, allow roll-ups to thaw on the counter for about 30 minutes before baking per directions above.
Learn from Leslie: For a filling option instead of the chive and onion, use 1/2 plain cream cheese and 1/2 blue cheese.
“The entire exterior of the house is black, from the cedar siding to the windows to the metal roof,” Michael says. “This means that at night our house essentially disappears aside from light in the windows.” Photos by Jean Allsopp
In 2019, Leslie and Michael O’Kelley were among the first property owners in Kennebec, a 41-lot gated community on Lake Martin. The couple was attracted to the community’s strict design guidelines and covenants. “We could see the vision of the neighborhood as a special place full of exceptional homes,” says Michael. “Our plan was to wait four or five years before starting construction, but we already owned a boat and were spending so many days on Lake Martin that we rapidly sped up our timeframe, even though it meant doing so on a smaller budget.”
Today, the lakefront house, built in 2021, doesn’t look or feel rushed at all. In fact, it disappears into the landscape as if it has been there for years. And inside, the vibe is one of casual—but chic—comfort. “The house definitely has a very relaxed feel,” says Leslie. “There is absolutely no pretentiousness, and we hope our guests feel like they can sit and relax without the worry of tracking in a mess or spilling their drinks.”
LEFT: Just in front of the screened porch is a level grass lawn for playing games like cornhole. The home is perched on a protected cove with few neighbors. “As a result, we get to enjoy calm water perfect for standup paddleboarding, swimming, and kayaking,” says Michael. RIGHT: Michael, Leslie, and 7-year-old goldendoodle Mack
While a lot of the tracks are paw-shaped and courtesy of the O’Kelleys’ goldendoodle Mack, Michael says it’s rare that they don’t have guests staying with them. Friends of the couple and their three teenage daughters make themselves at home in the 2,600-square-foot, four-bedroom vacation home. “While we didn’t strive to create a house that had a large number of beds, we are able to sleep 12 people comfortably and will often stretch that number higher when our daughters have friends visit,” says Michael.
The Lake Martin stays ostensibly include plenty of time outdoors—riding on the boat, enjoying watersports, playing lawn games, and lounging on the small beach at the edge of the O’Kelleys’ property.
The home’s interiors offer open spaces on the main level. Thanks to dormer windows (with alcoves designed to fit twin mattresses) and sloped ceilings, “the entirety of the upper level is tucked into what would have otherwise been attic space,” Michael says. “My primary goal for the design was to get the most usable square footage from the smallest footprint while also preserving enough land to add on in the future if needed.”
Opposite the living room, the kitchen is wrapped by windows and water views. Cabinetry is painted Benjamin Moore’s Lead Gray (2131-30), a nearly-black dark blue with a whisper of green undertones.A steel staircase with floating wood treads stands as a dominant feature when entering the home. The O’Kelleys’ goldendoodle, Mack, awaits guests. The dining table from IKEA is surrounded by contemporary clear acrylic seating. Antique upholstered head chairs punctuate the ends. The chandelier is from West Elm.
Similarly, the opportunity to dress the home in budget-friendly but style-savvy furnishings was not wasted. Leslie shopped smart in local Birmingham and Opelika stores, as well as online with retailers such as Joss & Main, Wayfair, and World Market. “We looked for furniture that was comfortable, durable, and low maintenance since it needs to stand up to lots of guests on a regular basis,” Michael says. And while the look is more designer-chic than predictable lakehouse style, Leslie adds that “a lot of the artwork and small décor items such as turtle shells and fish prints help tie the interiors to the water just outside.”
Even when it isn’t lake season, Michael says he has been surprised by how much use his family gets out of the house. The Kennebec- and Russell Lands-approved architect, who also works with Alabama Power on other lake communities, has a number of clients in the area, so the home comes in handy when he needs to spend the night. “Even on my work trips, I try to fit in a little bit of fun such as paddleboarding or trail running,” he says. “And I often run into neighbors along the way. Over the past few years, we have watched so many other houses being built in the community—and now many of those neighbors have become friends.”
The stone chimney serves as an accent in an upstairs bedroom. Stained-wood planks pick up darker hues in the stone while mustard yellow upholstery and linens bring in brighter tones.The stone chimney serves as an accent in an upstairs bedroom. Stained-wood planks pick up darker hues in the stone while mustard yellow upholstery and linens bring in brighter tones.Painted-white antique chairs gather around a contemporary dining table on the screened porch. All-weather woven furniture from Joss & Main makes a comfortable perch for keeping an eye on the water. A game of Giant Jenga waits for players nearby. “The porch is an ideal spot for reading, catching up on emails, or enjoying a cocktail,” Michael says.
I always ask my lake clients to consider large screened porches because they can effectively act as four season rooms if designed right.
How to Make Decorating with Neutrals Anything but Boring
1) Layer texture for interest.
White walls or neutral tones can fall flat without layers of texture. Incorporate materials such as horn, leather, wovens, hide, and fur to add dimension and warmth, making the space feel inviting rather than cold.
2) Mix vibes for contrast.
Pair modern art with antiques, clean lines and sleek finishes with rustic accents, and polished details with raw materials for an eclectic look.
3) Use nature as an anchor.
Incorporate timeless, natural materials such as wood, stone, and iron to ground the space and connect the home to its surroundings. These elements also add warmth.
4) Commit to the scheme.
A cohesive palette makes contrasts pop. By sticking to a black-and-white foundation, you can add visual drama through unexpected vintage finds, bold mirrors, or unique architectural details.
If you have a lake house, be ready for guests! “The lake is the perfect place to host friends and family,” says designer Farris Ann Crace. To up the style quotient and make everyone feel even more welcome, Farris Ann updated the guest house and screened porch at her family’s second home in the Trillium neighborhood on Lake Martin.
“Both the screened porch and the guest house are much loved spaces,” Farris Ann says. “The porch is almost always in use, whether for enjoying morning coffee, taking an afternoon snooze on the swinging bed, or winding down during cocktail hour.” Then, after a big day on the lake, guests can retreat to private quarters. “When visitors have their own space, it makes a weekend feel even more like a special getaway,” Farris Ann says.
Designed by Bobby McAlpine and built in 1994, the house is surrounded by water on three sides but still feels very private because of the many pine trees sheltering it.
Thoughtful design decisions made both spaces equally inviting. “On the porch, we chose furniture that was not so precious that you can’t sit down with a wet towel after a dip in the lake,” Farris Ann says of the durable Janus et Cie coffee table and sofa and lounge chairs.
With a focus on the view, the designer created multiple seating areas. “The lake and nature are paramount, and the furniture should be set up so that the scenery can be enjoyed as much as possible,” says Farris Ann. “This might mean setting up multiple seating arrangements to enjoy the views at different angles and during different times of the day.” For example, the designer arranged a pair of chairs to face the sunrise while loungers are poised for the sunset. “The swinging bed offers a respite from the sun on those hot summer afternoons,” she adds.
The warm, woodsy interiors of the guest house feature updated furnishings including a chest of drawers repainted in Tanner’s Brown (Farrow & Ball). The white coverlet and shams with scalloped edges set off a buffalo check accent pillow and bedskirt. Artwork is by Texas artist Brenda Bogart.
Equal consideration was given to updates in the guest house, a vaulted, 700-square-foot space above the garage that consists of a bedroom, kitchenette, lounge area, closet, and bath. Farris Ann repurposed some of the existing furniture with new upholstery and paint while starting fresh on the kitchenette and bathroom. To maximize space, she chose panel-ready refrigerator drawers to streamline cabinetry and appliances and opted for sconces in lieu of table lamps. “I also relocated the sink in the kitchenette to align with the center of the windows,” says the designer. She adds that the guest house is now the most coveted space. “It’s used by family and friends alike. We’ve nicknamed it the ‘General’s Quarters,’ because the most frequent guests are my grandparents, Major General and Mrs. Jack Farris.”
Meet Farris Ann Crace
Nashville-based designer Farris Ann Crace credits her upbringing in Mountain Brook as a big influence on the impact and importance our homes have on our lives.
“Designed correctly, interiors should elicit an emotional response—stirring up fond, old memories and inspiring new ones,” she says. “When our comings and goings are bracketed by the comfort, ease, and style of a well-designed home, I believe this enables each of us to live a more beautiful, relaxed, confident, and inspired life.”
The porch combines relaxed functionality with stylish design. Indoor/outdoor furniture anchors the space, while concrete end tables, black-and-white pillows, and lightweight-yet-sturdy rope stools add texture. The black-painted console table is a find from Southeastern Salvage. Photos by Jean Allsopp
When a Mountain Brook family set their sights on creating a lakeside escape, they found the perfect canvas in The Willows, a sought-after Russell Lands community at Lake Martin. With its stunning waterfront views and solid design, the house was everything they wanted—once they added their own style.
The homeowners dreamed of a retreat that would blend bold expression and serene comfort. Enter interior designer Lauren Conner who turned potential into perfection, crafting a striking home that’s equal parts modern and cozy. From dramatic contrasts to carefully curated details, the interiors prove that living by the water doesn’t mean blending in—it’s about standing out in style.
From the art to the oyster shell lamps and white-painted coffee table reminiscent of a sculpted tree trunk, every element in the living space adds depth without competing with the stunning view.A French buffet serves both the the kitchen and dining area. Originally a dark brown piece, the buffet was stripped to create a refreshed, more relaxed look in a lighter finish. Casual rattan dining chairs surround a dining table in a closely-matched finish.The chandelier drips with swags of leather stripping.While the kitchen kept its original finishes, Lauren elevated the space with thoughtful design updates that give it a fresh, modern feel. A bold black-and-white indoor/outdoor runner ties the space together, while the durable, easy-to-clean rope barstools offer chic practicality. Linen scrim shades provide privacy without blocking the view, and the polished nickel hardware from Brandino Brass refreshes the existing finishes, bringing a sleek, contemporary touch.
The transformation didn’t require any structural changes. Lauren took the existing layout and breathed new life into it by infusing the homeowners’ favorite color palette throughout. “We wanted to make the space more personal while also adding some patina,” Lauren shares.
To bring in the desired aesthetic, Lauren focused on the clients’ must-haves: a black-and-white color scheme, original artwork, and an abundance of unique finds. Practically every room features statement-making pieces that demand attention, such as the custom art above the sofa by Scott Kerr, as well as subtle details that delight, like the addition of at least one vintage piece to each room.
The designer also incorporated a variety of textures and natural elements to bring in more character. From weathered wood and woven runners to horn, leather, and rattan accents, everything was carefully chosen to ensure the home feels as natural as its lakefront setting.
The son’s bedroom features a custom gray flannel headboard, black rattan nightstands, and linen window treatments.LEFT: A 1970s mirror hangs above a Gabby chest in the primary bedroom. RIGHT: A barnacle-inspired vase compliments abstract artwork by Kristen Blakeney in the living room, perfectly reflecting the homeowners’ love for unique finds and black-and-white design.Linen draperies cover the wall behind the headboard to enhance the primary bedroom’s peaceful feel. Texture comes through in the faux Shagreen nightstands, seagrass baskets, and metal light fixture. Black-and-white artwork suspended from chains adds an unexpected twist. A lumbar pillow adds a custom touch to the the Annie Selke bedding.
Because it’s a lake house, we didn’t want it to feel too formal. The goal was to elevate the interior while keeping it relaxed and completely livable.
Lauren Conner
While embracing sophistication, Lauren also kept the practicality of lake living in mind by using performance fabrics and some indoor/outdoor furniture such as the kitchen barstools. Rugs and runners were strategically selected for their durability, ensuring they can handle sandy feet and damp paws with ease. These thoughtful choices allow the homeowners and visitors alike to enjoy the space without sacrificing the convenience and carefree spirit of lake living. “It’s a space that’s inviting and welcoming with an effortless comfort that makes you want to settle right in,” Lauren says.
The Bunkhouse
After purchasing the property, the owners decided to add a guest suite by turning the existing carport into a bunkhouse. This separate space not only allows them to accommodate more visitors, but also gives guests a bit of privacy while remaining conveniently close to the main house.
To ensure the bunkhouse felt connected to the main house, Lauren imbued a similar palette with bold contrasts in black and white. She added black-hide sling chairs to round out a seating area consisting of an existing slipcovered sofa and chairs. Vintage finds, such as a rug from an estate sale and a copper fixture over the table, infuse warmth.
Sleeping quarters are thoughtfully planned. Each bunk is equipped with its own reading light and shelf, and below the beds, drawers pull out for easy storage.
The custom, faux-leather banquette in the dining area is shaped to perfectly align with the windows. Wicker chairs add comfort and versatility, while the custom wood table lends even more organic character. The copper fixture is decidedly nautical, perfectly in keeping with lakeside décor. Painting by Catie Radney.
Sleepover, anyone? Accommodating guests at the lake or beach is a breeze with a well-designed bunk room. Get inspired by these designs that blend style and function for all ages.
A restructured loft with a new wall adds enough privacy to create a comfortable sleeping area. “The bottom bunk is a queen and the top is a double so even adults are comfortable,” says Paige.
This spacious bunk room design is easily accessible for all guests. A TV nook to the right of the bunks offers a spot for late-night movies.
Location: The Willows // Russell Lands on Lake Martin Builder: Legacy New Homes Designer: Ashley Chancellor Photo: Jean Allsopp Featured in:Endless Summer
LEFT: Home designer Adam Gerndt converted what was to be a storage room into a fun and playful bunk room for a growing family. The custom-made beds are accented with custom railing and bronze sconces from Visual Comfort. Blue and white linen and accessories are a mix-and-match combination from HomeGoods and T.J. Maxx.
Location: Smith Lake Home Designer: Adams Gerndt Design Group Interior Designer: Caitlyn Crowley, Nina Daniels, and Taylor Galloway // Adams Gerndt Design Group Builder: Gillespie Construction Co. Photo: Chris Luker Featured in:Inside a Rustic Smith Lake Retreat
RIGHT: A set of bunks maximizes space in this two-bedroom home, while ship-style lanterns and a rope ladder add nautical touches.
Location: Rosemary Beach Designer: Ashley Gilbreath Photo: Holland Williams Featured in:Behind the Design with Ashley GilbreathBuilt-in bunk beds in this Mountain Brook playroom give the youngest guests a space of their own. Pops of red energize the space.
Location: Mountain Brook Architect: Richard and Lynielle Long, Long & Long Design Inc. Designer: Katherine B. Melvin Photo: Jean Allsopp Featured in:Forever HomeCustom-built by contractor Nathan Allred, each bunk features a hidden nook that doubles as a nightstand, complete with a sconce and outlet.
Location: Smith Lake Architect: Barrett Architecture Studio Photo: Art Meripol Featured in:A Nod to Nature: Explore this Stunning Smith Lake HomeLEFT: Rolling barn doors open to the nautical-themed bunk room. Reminiscent of summer camp, the red, white, and blue color scheme is not only cheery in a darker space, it’s appropriate for the Patriotic holidays that draw the family to Lake Martin.
Location: Lake Martin Architect: Adams-Gerndt Design Group Designer: Marie Noojin // Defining Home Photo: Jean Allsopp Featured in:Great Lake Escape
RIGHT: These bunks claim a former closet space. “We carved out every square inch and picked up enough room for twin mattresses,” says designer Ashley Gilbreath. Curtains on the bunks offer privacy in this shared space.
Location: Orange Beach Designer: Ashley Gilbreath Photo: Laurey Glenn Featured in:Rivaling the View
It’s no secret that travel inspires design. A different landscape and vernacular are quick to stir the imagination and ignite ideas. From gardens to interiors and architecture, English designs have long influenced Southern style. Just take a look at Barnsley Resort in the North Georgia mountains. Built around the ruins of a storied 18th-century manor and gardens, the resort offers modern appeal yet stays true to its historical endeavors.
Barnsley Resort’s origins harken back nearly two centuries, but it was opened to guests just 25 years ago. Design influences are thanks to the vision of the original owner, Savannah shipping magnate Godfrey Barnsley, who had an affection for the work of landscape architect Andrew Jackson Downing. In the late 1980s, an ambitious Bavarian Prince purchased the property. Today the resort flourishes under the ownership of South Street Partners.
The cottages at Barnsley Resort were built to replicate the Carpenter Gothic styles that Downing and architect Alexander Jackson Davis published in a pattern book in the 1840s. Situated in a village atmosphere, the resort features cottages, gardens, an inn, restaurants, a clubhouse, a spa, and the ruins of the original manor that all intertwine via pathways. Recently renovated, the 39 cottages showcase fresh yet historical style thanks to Charlotte Lucas Design out of Charlotte, North Carolina. “The design vision innately came from the strong connection between the resort, the lush gardens, and its rich history,” Charlotte says.
Guest cottages range from one to seven bedrooms, and each features a living area with a fireplace, a separate bedroom with king-sized bed, and a bath with a claw-foot soaking tub.
“We were thoughtful to include a range of subject matter and mediums with the art in the cottage redesign,” Charlotte says of the traditionally-appointed interiors. “Similar to the inspiration for the furnishings, we wanted the art to speak to the resort and the expansive 3,000-acre property. We included still lifes, landscapes, equestrian themes, and more to resonate with the ethos of Barnsley Resort.”
Rooms include new wooden nightstands, painted dressers, colorful area rugs and artwork influenced by the resort’s offerings. Bathrooms feature wood vanities and checkered tile floors.
How to Recreate the Barnsley Resort Look
Designer Charlotte Lucas offers her tips for creating the cozy look of Barnsley’s cottages in your own home.
Accentuate the setting with pillows. Pillows create a warm welcome and are a nice way to add pops of color and texture to a room.
Accessorize, but keep it simple. Sculptures, lamps, and flowers give a space personality. We implemented nature-inspired pieces like cast-iron bird sculptures and wooden crisscross hangers that invite guests to hang their hats and jackets.
Create an accent wall. To add surprise-and-delight moments, we covered niches and baths with nature-centric wallpaper.
Resources
Charlotte Lucas:charlottelucasdesign.com, IG: @CharlotteHLucas Cottage wallpaper: Glen Plaid from Aux Abris in Cambridge Grey; Accent wallpaper: Emma from Ferrick Mason in Cinnabar Coffee Paint color for cottage living room trim, doors, and millwork: Sherwin-Williams Gris (SW 7659) Bedroom and bathroom walls: Sherwin-Williams Ibis White (SW 7000) Bedroom trim: Sherwin-Williams Smoky Blue (SW 7604)
Find Yourself at Barnsley Resort
Discover the charms and experience the adventures in all that Barnsley Resort has to offer.
The Ruins. Explore the remains and history of the villa, and stroll the classic boxwood parterre garden.
Hiking, Horseback Riding, Biking & UTV Trail Riding. The resort covers 3,000 acres and offers forests and fields to explore by any mode of transportation.
Golf & Pickleball. A 378-acre Jim Fazio championship golf course winds around the resort’s lake, forests, and gardens. Pickleball courts are a new introduction.
Lawn Games. Make s’mores at one of the many fire pits around the pedestrian village, or find a pickup game of cornhole or bocce ball.
Sporting Clays and Hunting. Take your shot at any of the 15-station sporting clays courses, or venture into some of the country’s best quail hunting grounds (in partnership with Beretta).
Pool, Spa & Fitness. The saltwater pool is a refreshing place to relax after a spa session or workout.
Lake Sports. Canoes, kayaks, paddles, life jackets, and fishing rods are available for use on a serene 10-acre lake.
Dining:
Woodlands Grill: Southern favorites in a hospitable club setting.
Biergarten: Casual, open-air setting offering beer, cocktails, and German fare such as hot pretzels and bratwurst, as well as wings, salads, and barbecue.
The Rice House: Elegant dining in a historic 19th-century farmhouse. (Currently under renovation. Reopening under a new concept late Spring 2025.)
Barnsley Resort Memberships & Private Events
Annual memberships to Barnsley Resort offer benefits and privileges for golf, hunting, or shooting 365 days a year, as well as exclusive events and offers just for members. Looking for a completely unforgettable venue for a special occasion? The Manor House and Pavilion transforms into a private event, reception, or ceremony space that is unmatched. barnsleyresort.com